Categories
Curry Daal Gluten-free Healthy foods Indian Lentils Low carb Maharashtrian Protein salad Vegan Vegetarian

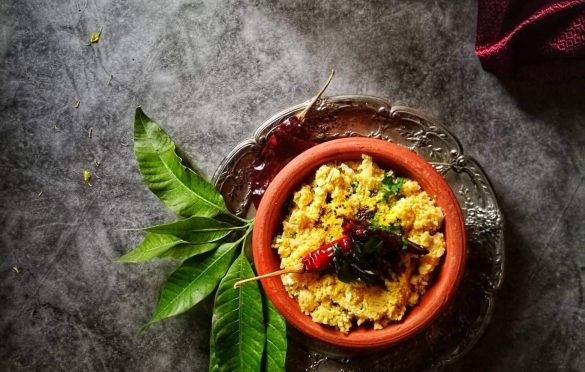
Pendpala- a dry masoor daal curry

Daal or lentils are an integral part of the Indian cuisine. Its used in many forms, with skin, without skin, powdered, roasted, raw and so much more. In parts of India where the water is scarce, not enough fresh vegetables, you will see a predominant part of region’s cuisine. If you visit Rajasthan, the western state of India, you will see so many dishes that made with Chick pea flour, like Gatte ki kadhi, Kachori etc.

Hearty Solapuri meal

Solapur, the town I come from is situated in the middle of state Maharashtra. There are no rivers or water bodies near Solapur and the summers are brutal. All of this means that the cuisine relies on shelf stable ingredients more than the fresh vegetables or fish. You will see use of Jowar and Bajra more than the wheat and rice. Jowar and Bajra and drought tolerant and need much less water than growing wheat or rice.

Millets like Jowar or Sorghum and Bajra or pearl Millet are excellent source of nutrients. They provide lots of essential nutrients not only to the human beings but it’s also gentle on the soil

Typically farmer, or those who do lot of physical labor, and come from neighboring villages for work, often pack a hearty lunch of Jowar Bhakri, peanut chutney and some dry subji. The subji is dry which prevents it from getting soiled in the hot weather of solapur. Often times it has lentils or chickpea flour

One such preparation is Pendpala. I don’t know how the name came about but I can guarantee you, it’s plain delicious. Full of protein, it’s is a a great compliment to the bhakri and completes the meal

I love that all of the ingredients needed to make this are shelf stable and easily available.

What makes it absolutely delicious is the Kala Tikhat, a special spice mix from Solapur. It’s a combination of many whole spices, along with onion and garlic. I will share that recipe soon. It’s made a few times a year and can be used in many recipes.

I learnt this from Anusaya. Anusaya is help at home but she is much more than that. She is family. She has been coming to our house for the last 45 years. I have rarely seen even family members as loyal as she is 🙂

Kala Tikhat

Some people call it Daal Kanda, which translates to Lentil Onion, and some also make it with toor daal. I make the Pendpala with Masoor daal and serve it with sorghum bhakri, peanut chutney, Green Tomato chutney and raw onion. A complete, balanced, wholesome, protein packed, gluten-free vegan meal 🙂

Masoor Pendpala Solapur style

Spicy, delicious lip smacking daal recipe, easy to make

Course Appetizer, Side Dish
Cuisine Indian, Maharashtrian, vegan, vegetarian
Keyword daal, lentils, vegan, vegetarian

Ingredients

  • 1 Cup Split masoor daal
  • 1 Onion Chopped
  • 2 Garlic cloves
  • 2 Tbsp Oil
  • 1 Tsp Turmeric Powder
  • 1 Tsp Salt
  • 4 Tbsp Roasted peanut powder
  • 1 Tbsp Chopped cilantro
  • 1 Tbsp Kala Tikhat
  • 1/2 Tsp Red chili powder optional

Instructions

Prep

  1. Soak the daal for 20-30 mins

  2. Drain the water

Cook

  1. Heat the oil in a wok. Add turmeric, and chopped onion and garlic.

  2. Cook the onions and garlic till soft, ensure that its not too burnt

  3. Add the drained daal, salt and stir to mix

  4. Cover and cook till the daal is soft on low-medium flame . We dont want it to be mushy. It should be cooked but hold its shape. It takes about 8-10 mins

  5. Add kala tikhat and red chili to taste

  6. Add peanut powder , cilantro and mix well

  7. Serve with Bhakri

Categories
Appetizer Healthy foods Indian Maharashtrian Side dish Snack Vegan Vegetarian

Kairchi Daal

Gudhi padwa is celebrated in Maharashtra, India as a new year. Across India the same day is celebrated by different names but the spirit is the same. We look at nature, and you can see that spring is in the air and this day is the celebration of the new beginnings. Bengali celebrate ‘poila boishokh’ , Keralite celebrate Vishu and so much more.  Not just in India but even Zoroastrians celebrate ‘Nowrouz’ which marks the first day of the spring. On this day they have a platter newly sprouting wheat is always on the table along with other things. 

I feel you feel like celebrating if you just look around. Where I live, there are beautiful blossoms everywhere, when I go for a walk, I see beautiful wildflowers, mustard fields with yellow flower and just a sense of rejuvenation. 

We went for a beautiful hike in a state park and saw so many beautiful wild flowers, it was just breathtaking. 

I picked a few of these and decided to make a Gudhi using those. 

In India, especially in Maharashtra we celebrate Navratri which starts on Gudhi Padwa. Often there are Haldi Kunku which is a gathering for women, an informal social gathering. The celebration is for a goddess and I remember very fondly my Aai coming up with amazing ideas for decorations. One year we had recreated a famous garden from southern india, another year was a beautiful swing made with flowers and plants. As a kid I loved helping Aai with this event.

This is also the season when you start seeing Green mangoes on the tree in India. So naturally traditionally two dishes using the green mango are always made for this haldi kunku, Aam Panhe, a drink made with cooked green mango & jaggery and the second is this , Kairichi Daal.

I love both of these things very much. Today when I picked up the green mango to make this, it turned out not very sour but the kiwis I picked up from the farmers market were so sour, so voila, a new dish is born. I added some Kiwi and the results were quite delicious.

It a super easy recipe, hope you guys like it. If you have any such traditions, I would love to know about them. 🙂

I have also written the recipe in Marathi, hope thats useful to some.

Kiwi Green Mango Lentil Salad

This is a typical dish made during the spring while the mangoes are still green and tart. Soaked lentils add a perfect crunch to this salad

Ingredients

साहित्य

  • 2 Cups Chana Daal
  • 1/2 Cup Peeled and grated Green Mango
  • 2 Kiwi Peeled and chopped
  • 3-4 Green Chili paste
  • 1 Tsp Salt
  • 1 Tbsp Sugar
  • 1/3 Cup Freshly grated coconut
  • 1-2 Tbsp Chopped mint leaves
  • 1 Tbsp Chopped cilantro

For tempering

  • 3 Tbsp Oil
  • 1 Tsp Mustard seeds
  • 1 Tsp Cumin seeds
  • 1/4 Tsp Asafetida
  • 3 Dry red chilies
  • 1 Sprig Curry leaves

Instructions

Method

  1. Soak the lentils for 4-5 hours at the least 

  2. Drain and crush them in mortar pestle, make sure you don’t make a fine paste

  3. Mix sugar, salt, coconut, mint, cilantro in the crushed lentils. Once its completely mixed, add the kiwi and green mango. 

  4. Heat oil in a pan. Check if its hot by adding a couple of mustard seeds, if they splutter add the rest of the ingredients and saute for 30 secs. Make sure it does not burn 

  5. Add this tempering to the lentil mixture. The salad is now ready 

  6. Serve at room temperature

Kiwi Green Mango Lentil Salad

This is a typical dish made during the spring while the mangoes are still green and tart. Soaked lentils add a perfect crunch to this salad

Ingredients

साहित्य

  • 2 Cups Chana Daal
  • 1/2 Cup Peeled and grated Green Mango
  • 2 Kiwi Peeled and chopped
  • 3-4 Green Chili paste
  • 1 Tsp Salt
  • 1 Tbsp Sugar
  • 1/3 Cup Freshly grated coconut
  • 1-2 Tbsp Chopped mint leaves
  • 1 Tbsp Chopped cilantro

For tempering

  • 3 Tbsp Oil
  • 1 Tsp Mustard seeds
  • 1 Tsp Cumin seeds
  • 1/4 Tsp Asafetida
  • 3 Dry red chilies
  • 1 Sprig Curry leaves

Instructions

Method

  1. Soak the lentils for 4-5 hours at the least 

  2. Drain and crush them in mortar pestle, make sure you don’t make a fine paste

  3. Mix sugar, salt, coconut, mint, cilantro in the crushed lentils. Once its completely mixed, add the kiwi and green mango. 

  4. Heat oil in a pan. Check if its hot by adding a couple of mustard seeds, if they splutter add the rest of the ingredients and saute for 30 secs. Make sure it does not burn 

  5. Add this tempering to the lentil mixture. The salad is now ready 

  6. Serve at room temperature

Categories
Bihari Drinks & Coolers Fat Free fibre Gluten-free Low GI Protein Vegan Vegetarian Whole Grains

Sattu Ka Sharbat & Banaras

Growing up in Maharashtra, India I had not heard much about this ingredient. My mom used to ask us to eat ‘Saatu’ but it did not quite register as a special thing.

Fast forward many years and I remember my first visit to Varanasi, I fell in love with this place. I know people talk about the dirt and filth but all I could see was the peaceful ghats, a tremendous sense of devotion, and one becoming aware of one’s mortality and of course the food.

Every corner you turned there was some amazing delicacy to be devoured. We feasted on Jalebis, Kachoris, Lassis and so much more. I don’t know if its the water, air or the fact that many of these places have been there for generations, but each thing tasted amazing. I don’t remember having bad food in that town.

A lot of the food eaten was Satvik, which means there was no onion and garlic in the recipe, honestly I did not miss it.

I am a Chai addict and I must say some of the best chai I have had was in Varanasi, I think its the milk thats pure and fresh which makes all the difference. I loved roaming through the lanes and exploring because I feel ‘Banaras happens in the gallis’

I just loved how chilled out people were here, taking there own time to read a news paper, chat with a friend over a plate of kachori or even get a haircut, everything had a sense of calm. I went on a boat ride every morning that I was there, just the sound of water and the oars, some bells in the background and bliss.

Ghats have a lot going on, different ghats decorated in different styles. If you just observe, you get to learn a lot.


I will never get tired of this city, its fascinating on many levels. I feel that even meditating here was very powerful and peaceful.

On our way to the airport we stopped for a cup of chai, I mean everyone knows what kind of chai you get inside the airport 🙂 . On the same stall this man was making litti chokha, and man that was some delicious preparation. He was roasting them on open fire and the best part was that the litti was stuffed with some tasty mixture called Sattu.

That was my introduction to this magical ingredient called ‘Sattu’. This is powder of sorts made with roasted whole chana in most part, however there are some variations that add barley as well as Jowar/sorghum to it. Its commonly seen in the Northern India, mainly Bihar & UP as well as Pakistan and Nepal. Simple sounding however a true superfood, Sattu can be used in multiple applications. Often times savory and sweet drinks are made using Sattu, and in Bihar you would get to taste delicious sattu stuffed litti or even parantha. I must tell you that parantha turns out amazing. I will share the recipe some day soon.

Not only does it taste good and easy to make but its a power house of health benefits. Super high in protein, fibre, gluten-free, vegan and perfect for the summer and it cools down the body.

So when I came back from Varanasi and was talking about it my driver was very happy. He is from Varanasi and an ardent Sattu follower. When he heard that I liked it, he brought two homemade sattu flours for me along with a recipe for the sattu savory drink. I made it and loved it.

I make an effort to make traditional recipes and follow whats good for you in that season, if you like that idea then try out this recipe. Its super easy

Sattu ka namkeen sharbat

Cooling  

Naturally gluten- free & vegan 

Low GI

Ingredients

  • 2 cups cold water
  • 2 tablespoon gram sattu
  • 1 1/2 tsp lemon juice like to taste
  • 1/4 T Spoon Sendha Namak
  • 1/2 tsp spoonful of cumin seeds
  • 1 tsp finely chopped mint
  • 1 tsp finely chopped cilantro
  • 3 tbsp peeled and grated Green Mango optional
  • 1/4 Tsp finely chopped green chillies optional
  • 1/4 tsp salt

Instructions

  1. Mix the sattu with a little bit of water, enure there are no lumps left

  2. Mix the rest of the ingredients along with the remaining water & stir

  3. Serve chilled 

Recipe Notes

You can also make a sweet version, mix a little bit of honey or Gud with water and sattu powder

Categories
Appetizer Bengali British European Protein Snack Vietnamese

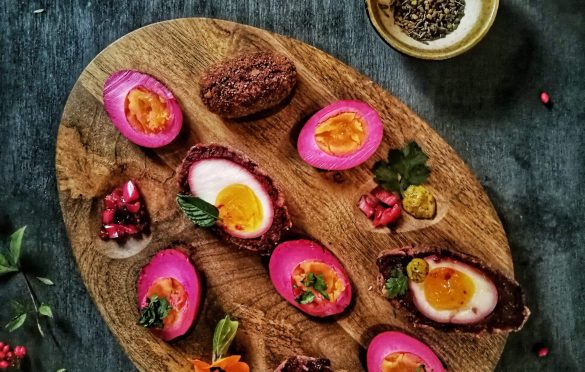
East-er Eggs – Indian scotch eggs

You know how some ideas just keep brewing in your head but it takes forever for it to happen, but when it happens its even better than what you had imagined. Today’s recipe is one of those recipes.

It has two may be three recipes. They are different and yet complimentary and there is one thing that ties them together. I get excited and happy when that common thread works just so wonderfully.

Part One – London & Kolkata

I visited Kolkata with the family and absolutely loved the Bengali cuisine, especially the snacks and the sweets. The sweets made with fresh chenna that melt in your mouth are to die for. We were there when the most prized ‘Nolen Gur’ was in season and the sweet shops were showcasing various things made using this liquid gold, I fell in love with this Gud. The softest Rosogulla and sandesh made using this Gud were my favorite.

There are many snacks that are popular in Bengal. Different types of kachoris, Jhal Moori which is a snack made with puffed rice and the famous ‘chaap’ to name a few. The word ‘chaap’ possibly comes the english word Chop, but this one has no meat in it and instead is made from different vegetables, especially beets which gives it the classic red color. Its served with chutney like most Indian snacks.

I started making these chaap ever since then and everyone loves them.

I love traveling, within the country, internationally, alone, with a group, I just love to travel and more often than not, food is a critical component of my itinerary. So even when I was on a business trip to London, I made sure I visited the grocery store and local market and tried some of the specialities. One of the things I ate for the first time was Scotch Eggs. An egg wrapped up in minced meat and fried, then cut open and served with some mustard, its a popular pub food. I love eggs in any form so I had obviously liked these.

Today I decided to borrow on these two ideas for a a recipe I had in mind.

Beet Scotch Eggs

I took the beet mixture from the Bengali chaap, wrapped it around very soft boiled egg and deep fried it.. result.. delicious !!!!

Bangla Scotch Eggs with Kasundi

This recipe is inspired from two dishes I tasted and loved. 

Ingredients

  • 4 Beets Boiled and grated
  • 1 Potato Boiled and mashed
  • 1 Onion Finely chopped
  • 1/2 Tsp Garlic Paste
  • 1/2 Tsp Ginger Paste
  • 1/2 Tsp Garam Masala
  • 3/4 Tsp Roasted Jeera Powder
  • 1/2 Tsp Red Chili powder
  • 1 Green chili Finely chopped
  • 1 Tbsp Oil
  • Salt to taste
  • 4 Eggs

For coating

  • 1/3 Cup Maida/ All purpose flour
  • 1/3 Cup Water
  • 3/4 Cup Bread Crumbs

For Frying

  • Oil

Instructions

  1. Heat oil in a pan, add chopped onions and saute till soft

  2. Don’t let them caramelize 

  3. Add ginger and garlic paste and saute for a few secs

  4. Add the grated beet and saute till its almost dry 

  5. Now add cooked potato thats very well mashed

  6. Mix and saute well till the mixture is dry 

  7. Add salt, a pinch of sugar, garam masala, cumin powder and red chili powder

  8. Mix well 

  9. Add green chilies and turn the heat off 

  10. Set the mixture aside to cool 

Cooking the eggs

  1. Boil water in a sauce pan

  2. Once the water comes to a boil, slowly add all the eggs in the pot

  3. Cook for 4-5 mins with a rolling boil

  4. Drain the eggs  and run  under  cold water 

  5. Peel the eggs and set aside 

Batter for Frying

  1. Make slurry with the all purpose flour and water. The slury should be thin but thick enough the coat the egg. 

  2. Take the breadcrumbs in a bowl and season with some salt

Heat some oil in a deep pan on medium heat

Frying the eggs

  1. Take one eggs and fourth of the beet mixture. 

  2. Cover the egg completely with the beet mixture, making sure the coating is even and no gaps. Press the coating tightly, this ensures that the coating will not fall off while frying 

  3. Dip this beet covered egg in the slurry, ensure it oats the whole surface

  4. Roll it in the breadcrumbs 

  5. Fry the egg in the oil on medium heat till its crisp all around

  6. Let it cool and then cut it in half carefully. Since the egg is half boiled, the yolk would be soft and spreadable

  7. Serve with pickled onions and Kashundi 

Part two- California, Bengal

I love eggs and I love to eat them in any form, wait did I already say that? Anyway so I love making sandwiches as the weather gets warmer and one of my favorite is Banh Mi, a Vietnamese sandwich. Crusty white roll with even crunchier pickled vegetables, its a treat. I feel that pickles of all kind can perk up even a boring meal. Although now pickles are made in every part of the world, it is said that the process of pickling might have started in 2400 B.C in Mohenjo Daro. No matter who started making it, it sure is a favorite of many unless you are in a pickle ( get it 🙂 , sometimes I surprise myself with my play on words, hehe !)

So I wanted to pickle my eggs to make egg sandwich and then I got inspiration from the ‘Pennsylvania Dutch’ who add beets to their pickling process and I did just that. But I wanted to make it a little different and drew on my Indian spice box and one of favorite spice mix, Panch Phoran. Panch Phoran translates to Five Spices, it comes from Bengal, east India. Typically it has fenugreek, Cumin, Mustard seeds, Nigella seeds and Fennel. I love it because even though its simple, it delivers amazing flavor to any dish you add, daal, meat, fish or even pickle 🙂

These pickled eggs provide the much needed acidity to the fried Beet Scotch eggs.

Panch Phoran pickled eggs

Ingredients

  • 3 Tbsp Panch Phoran recipe on the blog
  • 1 1/2 Cup Red Wine Vingar
  • 4 Tbsp Thinly sliced shallot or red onions
  • 2 Beets Sliced or qurtered
  • 2 Tbsp Sugar
  • 1 Tbsp Salt
  • 4 Eggs Soft Boiled
  • 1 sprig Mint to serve
  • 1 Tbsp Kasundi to serve

Instructions

  1. Mix salt & sugar in the red wine vinegar and stir till dissolved 

  2. Gently pound the panch phoran and add to the vinegar

  3. Take a glass jar and add the eggs, sliced shallot and beets to it

  4. Pour over the vinegar mixture

  5. Close the lid and let it sit in the fridge for 2-3 days 

  6. When ready to serve, cut the eggs in half carefully

  7. Chop the pickled onions and beets finely

  8. Top the egg with the chopped onions and beets 

  9. Garnish with mint and kasundi 

Recipe Notes


Panch Phoran : Here is a simple recipe for your reference 

Don’t keep the eggs for longer than 3 days, you will not have a beautiful demarkation of red/pink and white

To soft boil the eggs, add eggs to boiling water and cook for 5 mins. Drain and run under cold water and peel 

You can also make deviled eggs with this. 


Categories
bread Indian Maharashtrian Snack Vegetarian

Mumbai Pav

The first thing I do when I land in Mumbai the first thing I do is have a cup of cutting chai, you know I am super crazy about Chai, I probably have 4-5 cups everyday.

The second thing I do is have Vada Pav. I have fond memories of traveling in the train and eating Vada Pav, served with spicy sautéd green chili and garlic chutney. I have a recipe for Vada Pav

Vada Pav is a popular street food in Mumbai, in fact Mumbai has amazing street food in general. Pav Bhaji, Pani Poori, Vada Pav, Tawa pulav, Ragda Pattice, Kutchi Dabeli, the list just goes on and on. When you talk about food like Kutchi Dabeli, Vada Pav, Pav Bhaji, you quickly realize that Paav/Bread is a critical element for these.

Kutchi Dabeli

In Mumbai this bread is called Laadi Paav. Laadi is the tiled floor, when you see the sheets of this bread, you understand why it gets that name.

The bread came to India with the Portuguese, as I was reading more about this it seems like this Laadi Paav is similar to the Portuguese bread, Papo Secos. When I visited my sister in Miami, I tasted a Cuban bread, Pan De Agua and it was very smilar to the Ladi Paav.

My family is crazy about Pav Bhaji and Kutchi Dabeli, I end up making these at least twice a month if not more. In California I tried using Burger buns, dinner rolls, Kaiser rolls, but nothing tasted like the Paav I was used to eating growing up in India. So I talked to many people, read books, watched videos and came up with a recipe that works perfect for my family, I feel it comes closest to the Paav I have eaten.

Paav is made with simple ingredients like Yeast, Flour, Sugar and water. When I talked to some of the bakeries, I was told that its a poor man’s food so no fancy ingredients like Milk Powder or milk are used.

The trick is in the process and I feel that these three things are important:

  • High hydration dough- The dough should be quite lose, this allows the yeast to create large air pocket while baking.
  • Gluten formation- The dough needs to be kneaded so that strong gluten forms which can stand up to those air pockets while baking.
  • High temperature baking- Baking at high temperature for a shorter time is critical to get that crust.

I feel bread making is just as much an art as science, do even though I have given the exact recipe, I have also made a video which shows all the steps in detail.

Once you master this, you will be able to make them at home with the ingredients of your choice, I use unbleached organic flour and organic butter.

Ladi Pav

Pav Bhaji, Batata vada or kutchi dabeli, these all dishes are incomplete without a perfect Paav. This easy to make recipe will remind you of the Ladi pav from Mumbai.

Course bread, Snack
Cuisine Indian, Maharashtrian
Keyword Ladi Pav, Paav, pav, pavbhaji, vadapav
Prep Time 20 minutes
Cook Time 10 minutes
2 45 minutes
Total Time 30 minutes
Servings 6

Ingredients

  • 190 gms Water About 3/4 and a little more
  • 7 Gms Instant Yeast About 2 1/4 Tsp or 1 packet
  • 2 Tbsp Sugar
  • 250 gms All Purpose Flour
  • 3 Tbsp Unsalted Butter melted
  • 1 Tsp Salt

Instructions

  1. Heat the water to 100F. I use a thermometer to check because this is critical for the yeast to rise.

  2. Add sugar and yeast and set aside for 5 mins

  3. Add melted butter to the flour and mix. Add salt and mix it a little more. 

  4. By now the Yeast mixture should be frothy, this shows that the yeast is active

  5. Add the yeast mixture to the flour and mix until it comes together. 

  6. Now take the mixture on the counter and knead for good 10 mins. Don’t be alarmed if the mixture is wet, as you knead you will see that it comes together. 

    Dont be tempted to add more flour. Lose dough is key to a fluffy and soft bread

  7. Put the dough in a greased bowl, cover and let it rise for about 50- 60 mins. The dough should double, so if the temperature is cold, let it rest for 60 mins

  8. After 60 min, take the dough on the counter, deflate and knead for 3-4 mins

  9. Divide in 12 equal pieces. I use a scale. Equal balls ensure that the bread is of same size and also cooks uniformly

  10. Grease and dust with flour a 9×13 pan. I use the Wilton Brownie pan. 

  11. Roll the dough pieces in a tight ball and arrange in the pan. Make sure when you roll, you are making the surface taught, and also the seam side should be down. This ensure that when the dough rises, all air gets nicely trapped, making for a spongy bread

  12. Let the balls rest anywhere from 60-75 min. They should be visibly plump

  13. Heat the oven to 450 F

  14. Bake the bread for 8-10 mins. After 10 mins even if the crust does not look super dark brown, dont be tempted to bake longer

  15. Take the pan out and immediately brush with a little butter

  16. Cool on the baking rack. 

  17. Enjoy the Paav is ready

Recipe Video

Categories
Breakfast Indian Maharashtrian Snack Vegetarian

Dahi Sabudana- tapioca pearls with spiced yogurt

Spring/summer  is here. The rain gods have been kind and hence all the mountains around where I live are still green.  Near my home there is a barn and they bring out their sheep for grazing at this time, with the rolling hills, and the sheep,  it feels like Swiss countryside.
In India, we celebrate Holi. During holi a effigy of a demoness is burnt in fire. This demoness symbolizes all the mean thoughts, all the resentments that one might be carrying, you burn it all in the fire of Holi.  This is the time when we celebrate New Year according to the lunar calendar. Interestingly around the same time Parsi’s and Iranis’s also celebrate Navrouz, which translates to ‘New Day’. In short its all about starting afresh, leaving all the baggages that you might be carrying and focus on the future.

In India we have Navratri ( which translates to ‘9 nights’) twice a year. Interestingly they both fall when the season changes from hot to cold and cold to hot. One is in spring time and one in fall. During this time you fast, you don’t eat meat, regular vegetables, no cereals. I think it is very much needed, it gets your body time to adjust and also get ready for the new season. Its like a cleanse, where you eat light foods, people also try not to eat garlic & onion.


Each region in India has its own rules of what to eat and what not to eat during these nine months, some eat spinach, some eat tomatoes, others don’t. A few things like tapioca, water chestnut, sweet potatoes, cucumber are eaten across the country.

I come from Maharashtra where Sabudana Khichadi is very popular. I recently did an Insta story on it. Whenever I ask my kids what they want special for breakfast, the answer is Sabudana Khichadi . My husband can eat bowls of it. I normally end up making enough so I have leftovers as he likes to eat it the next day again.

Everyone knows Sabudana Khicadi but might not know this recipe. My mom makes it so well, my sister can eat bowls of it for days and not get tired. I like it more than Khichadi because it feels kind of cooling and I love yogurt 🙂

Dahi Sabudana

Ingredients:

  • 2 cups tapioca pearls ( you can get them in any indian grocery store)
  • 3-4 green chilies ( I use the thai chilies that are super spicy)
  • 1 1/2 tsp Cumin seeds
  • 1/3 cup roasted peanut powder
  • 1 cup buttermilk (if you can not get buttermilk, you can churn 1/2 yogurt with 3/4 cup water)
  • 1 cup
  • salt to taste
  • 1 tbsp sugar
  • 2 tbsp chopped cilantro

Method

  • Dry roast sabudana/tapioca
  • After it is cooled down, soak in some water for about 30 mins
  • Pound the cumin seeds and chilies to make a coarse paste. I prefer using mortar pestle but you can also use a chopper
  • After 30 mins, drain all the water and soak in buttermilk for at least 4-5 hours.
  • Now add yogurt ( preferably whole milk), roasted peanut powder, chili-cumin mixture and salt n sugar to taste.
  • Garnish with cilantro

Note:

  • You can also cook the sabudana in water until it is translucent ( instead of roasting and soaking in buttermilk).
  • Mix it with yogurt, roasted peanut powder, salt, sugar and the chili cumin mixture. You can also  add tadka of ghee jeera mirchi if desired
  • Garnish with cilantro
Categories
Cookies dessert Mexican

Churros

I love Mexican food, in fact the whole family loves it very much. Sometimes I wonder if I was Mexican in my previous birth, because just as much Indian food, Mexican food is a constant feature in my kitchen.

IMG_7003.JPG

It’s Cinco de Mayo and I love to celebrate it. I never need an excuse to make something tasty, but when it’s fiesta time, it’s so much more fun! Such celebrations remind us that we live in the land of the free where many cultures have blended so well.

Anytime I visit a new place, the first thing I do is visit the local markets. I feel like I can learn so much more about the culture and the people of that country. Sometimes, people outside a country get a very limited view of that country’s cuisine. There were so many things in this Mazatlán market that I had never seen in the US! I ate these amazing churros in that market. They were perfectly crispy on the outside and soft on the inside, and the cinnamon sugar that they were dipped in was at the perfect level of sweetness to make you crave for just one more! Ever since I had those churros, I have been meaning to try them in my own kitchen.

IMG_5079

Most of the recipes for churro call for eggs, but the street vendor didn’t use eggs in his dough. So I am taking that vendor as inspiration and bringing you an eggless churro recipe. Seriously, this comes together in an hour from start to finish (including the cooldown time).

Today I am planning to pair these churros with something yummy. When you think of summer, the first thing that comes to mind is ice-cream, right? Today I am making an ice-cream to go with our churros. The contrast of crunchy churros with creamy ice-cream is just yummy.

I make a weekly trip to my local Mexican store and that’s where I picked up a can of ‘dulce de leche’ (which translates to sweetened milk). Dulce de leche is a smooth, gooey goodness that I can eat with a spoon directly from a can. It goes great on your ice-cream sundaes, you can make flan with it and so much more.

Today’s ice-cream is a Dulce de Leche Ice-cream. It is a super simple recipe. Also, just like the churro, this is also an egg-free recipe.

Back to our churros. Typically, churros are a straight stick but today, since I’m planning to use them to make my ice-cream sandwich, I am going to pipe them in a spiral. I have decided to use a gadget which is very common in a Indian household, a chakli/murukku maker. It is used to make many savory snacks as well as fresh rice noodles. I love it because it’s very easy to use and clean. It comes with many discs which help you make different shapes.  I have a video on youtube which show I made it.

18199097_10213191958703007_3017445048061251461_n

Ingredients

  • 1 cup water
  • 2  tablespoons white sugar
  • 1/2 teaspoon sea salt
  • 2 1/2 tablespoons vegetable oil
  • 1 cup  unbleached all-purpose flour

Oil for frying

For

  • 1/2 cup white sugar, or to taste
  • 1/2 teaspoon ground cinnamon
  • 1/2 teaspoon Ancho chili powder

Directions

  1. In a small pot, heat  water, 2 tbsp sugar, salt and oil on a medium flame. Bring to a boil and remove from heat. Stir in flour until mixture forms a ball.
  2. Let the dough cool down till it’s ok to handle.
  3. While you are piping the churros, heat the oil on low heat. I have used regular vegetable oil for frying.
  4. Now it’s time to pipe out the churros. Since I am planning to make the cookies, I will be making churros with a smaller diameter. However, you can use a pastry bag with a large star tip if you are making big sized churros.
  5. Pipe out 3″ spirals onto a baking sheet lined with parchment paper. (I like my ice-cream sandwiches to be bite-sized, so I won’t make them huge.)
  6. If the weather is hot, you can stick these piped spirals in the freezer for a few minutes. This helps the spirals stay together, or you might end up with a long churro in your pan.
  7. Fry the churros until golden brown. Make sure you don’t fry them on high heat, otherwise they will stay doughy inside and burnt outside.
  8. Combine 1/2 cup sugar, ancho chili powder and cinnamon. Roll drained churros in the mixture.

Notes:

  • I made the churros two ways:
    • The ones I fried right after I piped them were soft
    • The one I froze before I fried stayed much crispier
Categories
Indian salad Side dish Vegetarian

Nepalese Fiddlehead Ferns

I love going to the farmers market no matter where I go. So when I walked to the ferry building in San Francisco yesterday, I decided to swing by the market and pick up something for dinner. I picked up some kumquats and Lisbon lemons. I went inside the building. That building is one of my favorite places to visit, yummy baked goods, flavorful olive oils, natural soap, ice-cream, so many fun things to try. 

IMG_7694.JPG
There is a shop that is  my favorite shop, they carry different kinds of mushroom among other interesting things. I visit them every time I go there.  Today I saw some morels, ramps and fiddlehead ferns. I was so excited because I have never cooked ramps or fiddlehead before. I bought them and planned my dinner around it.
IMG_9547
Today I saw some morels, ramps and fiddlehead ferns. I was so excited because I have never cooked ramps or fiddlehead before. I bought them and planned my dinner around it.
When I started reading about it I found out that even though Fiddlehead ferns are not common across India, the northern states of India use it when in season. In Kashmir region, these are pickled as well. You cook it with some dry spices with potatoes.
In Nepal it is used as well.  I remembered that when I visited Nepal in Feb 2015, I had eaten ‘ Neuro ko Tarkari’ and I had loved it . So today I decided to make a Nepalese recipe with these fiddleheads.
Like all other Nepalese recipe, it is very easy to make and quite simple.
IMG_9540

Ingredients

  •  3-4 cups Fiddlehead ferns
  • 2-3 tbsp Clarified butter/ Ghee
  • 1/4 tsp Fenugreek Seeds
  • 1/4 tsp cumin seeds
  • 1/8 tsp turmeric powder
  • 1 green chili chopped
  • 2-3 cloves of garlic chopped
  • 1/2 tsp Cumin powder ( optional)
  • 1/2 tsp coriander powder (optional)

Method

  • With a soft brush remove the brown fuzzy part from the ferns
  • Cut off the fat, tough stems ( just like asparagus)
  • Boil a pot of salted water and blanch the ferns
  • Chop roughly or leave it whole. I left mine whole since they were baby size
  • Heat ghee, when hot add fenugreek seeds, cumin seeds chili and turmeric
  • Add chopped garlic and saute lightly. Dont let the garlic burn
  • Add the blanched ferns
  • Saute for a couple of mins, add the ground spices
  • Serve as a side dish

IMG_7697

Categories
dessert Indian Maharashtrian

Pakatali Poori- Saffron- Lemon flavored bread

I not only love to cook and learn new foods, but also love to learn about the ‘Old foods’. I feel in this era of instant and quick foods, we are missing out on some incredible dishes. We dont know how to use certain ingredients and soon those will become extinct. A lot of the dishes our gradmoms made, have never been a part of the food at our table.

I am thankful to books like Ruchira, we have access to at least a few of the Maharashtrian recipes. Its a book that is given as a wedding gift to every new bride in Maharashtra. I have used it extensively as when I got married, I did not know how to cook. I would call my mom but 1 minute call to India costed $1.90 and there was no internet. So getting cookbooks, going to the library and watching cooking shows was how I learnt my cooking.

Going back to the ‘lost recipe’, this recipe is almost on the verge of it. Today is Vasant Panchami, a day that marks the arrival of the ‘Vansant ( spring)’ season and you also worship Goddess Saraswati on this day.

img_5417

 This is a very special recipe because of Baba’s aunt used to make it, and she made it really well. I thought, why not make something I have never made before,after all Saraswati is a goddess of Knowledge, and what better tribute than a new( old) recipe. 

I have made  a couple of small modifications o the original recipe, I mixed half Rava and half all purpose flour, also rolled the poori like you roll the Chirota or Khaja ( another Maharashtrian delicacy)

It is a very easy recipe and you will find most of the needed ingredients at home. 

Pakatali Poori

pakatali-poori-main

Ingredients 

Poori

  • 1/2 cup fine rave
  • 1/2 cup All purpose flour
  • 3 tbsp Ghee ( clarified butter) melted and slightly warm
  • 3 tbsp sour full fat yogurt 
  • Pinch of salt

Syrup

  • 1 cup fine sugar
  • 1/2 cup water
  • 1/8 tsp cardamom powder
  • Saffron strands
  • Juice of 1 Meyer Lemon

Method

Poori

  • Mix the rave and APF together with salt
  • Add warm ghee and rub it well in the dry mixture
  • Add dahi to make a stiff dough. If the yogurt/dahi is not sour, you can leave it on the counter so it turns sour. It is crucial since that it what gives these pooris or breads a nice taste
  • Let the dough rest for at least an hour. If you have used only Rava, you would need to let it rest for 2 hours
  • After 2 hours, pound the dough, this is necessary to make it pliable. If you have a stand up mixer, you can use the dough attachment to do the work 

Syrup

  • Mix sugar and water and cook till its ‘2 string stage’ *
  • Heat a pan on very low flame, add the saffron strands and slightly roast them. You are just warming them and not quite roasting. Warming them makes them crumbly and hence they mix well in the syrup
  • Add cardamom powder, saffron and the juice of 1/2 lemon
  • Keep the syrup on a low flame, but keep it warm. This ensures that the syrup soaks in the Pooris. If the syrup is not warm enough, it will only create a coat on the outside

Making the Pooris

  • Heat oil in a deep pan
  • You can roll the Pooris like a regular flat bread, or
  • Roll out a big poori. Make a roll and cut into 4-5 pieces
  • Flatten those pieces again to make a poori
  • Fry the poori till golden brown
  • Drain and immediately add them to the warm syrup. 
  • Ater 10-15 mins, take them out and arrange on a plate
  • If you like, you can user slivered almonds or pistachios as well

img_5407

Categories
Breakfast French Kids favorite Snack Vegetarian

Leek, Potato & Goat cheese Galette with Pistachio Crust

Last few days have been very challenging, I consider myself a very strong person but it is amazing how vulnerable one gets when they are emotionally invested. I know it will be alright eventually but right now it hurts.  I really needed to do something that takes my attention away. So I have started lifting weights and  decided to try at least one new  recipe every week.

I love love brunches. You can try different things than your usual lunch and you are not rushed to have everything ready. Perfect for lazy mornings and occasions like Mother’s day. On the occasion of Mother’s day, I am sharing this recipe that can be a perfect addition to your brunch table. You can make the prep ahead of time and then comes together in less than 15 mins.

I love nuts, and especially pistachios. I am in love with combination of  green, pink colors you see in these raw nuts. I recently made a nice torte with pistachio crust and it was a major hit at my work.  Todays recipe uses the nuts in the crust, giving it a unique toasty flavor and crunch.


I had seen this recipe on Bon Appetit and have been wanting to make it. I have grown fond of goat cheese recently and loved the contrast of the tangy, creamy goat cheese against the caramelized leeks and sweetness of honey.

Goat Cheese & Leek Galette with pistachio crustPistachio Galette


Ingredients

For the dough

  • ½ cup shelled pistachios
  • 2½ cups unbleached flour
  •  1 teaspoon kosher salt
  • 1 teaspoon sugar
  • 1 cup (2 sticks) chilled unsalted butter, cut into pieces

_MG_3035

Toppings

  • 1 tablespoon olive oil, plus more for drizzling
  • 1 large leek, halved lengthwise, white and pale-green parts only, finely chopped
  • ¼ cup  heavy cream
  • 4 ounces goat cheese
  • 2 garlic cloves, finely chopped
  •  2/3 Kosher salt, freshly ground pepper
  • 4 tablespoons coarsely chopped dill, plus more for serving
  • 2 large Yukon Gold potatoes, thinly sliced
  •  1 large egg, beaten to blend Honey (for drizzling)
  • Crushed szechuan peppercorns
  • Flaky sea salt (optional; for serving)_MG_3039

Method

 Dough

  • Pulse pistachios in a food processor until coarsely ground. Add flour, kosher salt, and sugar and pulse until combined.
  • Add butter and pulse until a coarse meal forms.
  • With motor running, slowly add ½ cup ice water and process until dough comes together.
  • Transfer dough to a work surface, form into a ball, and flatten to a disc.
  • Wrap dough in parchment and chill 30 minutes.

Topping

  • Preheat oven to 400º. Heat oil in a small skillet over medium-low; cook leek, stirring occasionally and being careful not to brown, until just softened, about 5 minutes.
  • Meanwhile, mix cream, goat cheese, and garlic in a medium bowl until smooth. Season with kosher salt and pepper. Line a rimmed baking sheet with parchment.
  • Transfer dough to a work surface and divide into 4 pieces.
  • Working with one piece at a time, roll out to an 8″ round.

Layer it up

  • Using an offset spatula, spread one-quarter of the goat cheese mixture on dough, leaving a 1″ border.
  • Top with 1 Tbsp. dill and a thin layer of potato slices. Drizzle with oil and season with kosher salt.
  • Top with one-quarter of the leeks. Fold edges over, overlapping slightly.
  • Carefully transfer galette to prepared sheet. Repeat with remaining dough and filling.
  • Brush crusts with egg wash. Bake galettes until crusts are golden brown and potatoes are soft, 30–40 minutes. If you want to make a vegetarian version, you can skip the egg and instead use some water mixed milk to brush the edges.

Cut slice

Original Recipe:

http://www.bonappetit.com/recipe/goat-cheese-leek-and-potato-galette-with-pistachio-crust#recipe-ingredients

en_USEnglish