Categories
Gluten-free Maharashtrian Vegan Vegetarian

Fanas Sandane

Isn’t it amazing that when you see the traditional recipes, you can tell so much about the culture of that place, the produce and even the weather. Like when you go to the coastal India across different states, you will see abundant use of ingredients like coconut, or generous use fruits like mangoes. With subtle variations, you will see similar dishes made in many parts of the coast. For example, since the rice grows so beautifully, you will see predominant use of it in every course of the day.

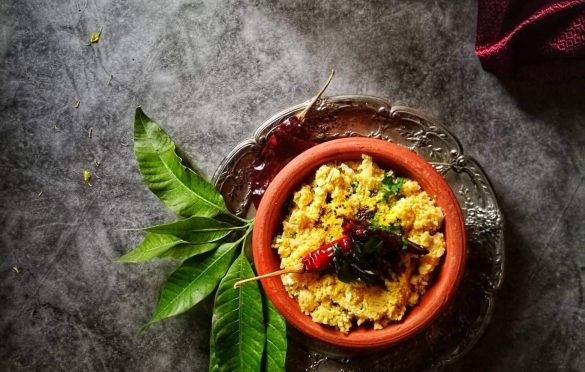
I am amazed to see the wide range of recipes created just using the humble ingredient like rice. Fermented, powder, cooked, slurry, dried, roasted, puffed and so much more. Today’s recipe uses Rice Grits

Fanas Sandane

When I started this mini project of cooking through India, the toughest thing is to pick one dish to represent a state. I am trying to showcase lesser known dishes so I can showcase that Indian food is a lot more than Chicken Tikka and Naan

I also love using traditional techniques and utensils. Today I have used a copper steamer that I got from my mother in law, who got in from her mother in law. I use it to steam modak, aloo vadi etc. I usually line it with a banana leaf and it works awesome.

Today we are going to Maharshtra, a western state of India

When we talk about foods of the state of Maharashtra, everyone talks about Vada Pav, Sabudana Vada and trust me those are delicious. But I wanted to share something a little different so here is today’s recipe thats a tribute to my visits to Parshuram and humble ingredient Rice

I have fond memories of visiting my Nani’s place Parshuram in Konkan. Parshurma is a small town in Ratnagiri, named after the Lord Parshuram. There is a temple from 1700 AD for this incarnation of Vishnu. I always loved visiting Parshuram. Small humble homes built with red chire, luscious greenery, birds chirping in the background, it was just peaceful. We would enjoy unbelievably delicious Alphonso mangoes, green jackfruit subji with cashews, Kokam sherbat and so much more. My mami would make Gurgutya Bhaat, a rice porridge for breakfast and would serve it on a beautiful teak leaf. The same Those were some beautiful days.

One such memory from Konkan is Sandane. Sandane is a steamed rice cake. In this recipe, its sweetened with the pulp of jackfruit but when you can also use jaggery to make another type of sandane. I love jackfruit and try to make as many things as I can when its in season. Hope you all like the recipe and follow me along my journey cooking through states of India.

Fanas Sandane

A delicious recipe made with sweet jackfruit and rice

Course Appetizer, Breakfast, Dessert
Cuisine Maharashtrian
Keyword ghee, jackfruit, rice

Ingredients

  • 2 Cups Jackfruit pulp 20 jackfruit pods
  • 1/2 Cup Jaggery
  • 1.5 Cup Rice Rava Coarse rice grits
  • 1/4 Tsp Salt
  • 1 Pinch Baking Soda
  • 1/2 Tsp Cardamom powder
  • 1/4 Tsp Nutmeg Powder

Instructions

  1. Dry roast the rice rava for 1 min, let it cool

  2. Puree the jackfruit to a smooth pulp

  3. Add jaggery, salt, cardamom and nutmeg and mix well

  4. Mix the rice rava in the jackfruit mixture

  5. Rest for 20 min

  6. Heat water in a steamer. Grease the Idli molds, or any other pan with some oil

  7. You can also use turmeric, banana or teak leaves to steam this

  8. Add the baking soda if using and stir well

  9. Add the mixture to the molds and steam till completely cooked

  10. Time needed would depend on the size of the mold

  11. Serve hot with ghee

Recipe Notes

You can also serve this with sweetened coconut milk 

Categories
Appetizer Chutney Condiments Indian Maharashtrian Vegan Vegetarian

Green Tomato Chutney

Green Tomato Chutney

In Solapur dry chutneys are more popular. Of course the most famous one, Peanut chutney along with Flaxseed and garlic chutney often grace the dinner plate. They have a long shelf life and that’s critical in the hot arid weather of Solapur. However there are a few wet chutneys that are also made often here, and one of them is this Green Tomato chutney.

I am not sure why but its called Bel Vangyachi chutney as well. This recipe is a classic example of how a few simple, humble ingredients can create magic. You take a bite of this and there is a burst of flavor in your mouth. It comes together real quick too

Often times in Solapur when the jowar bhakri (sorghum flat bread) is made on the wooden chulha, the bhakri is kept to get crunchy. While that’s happening, on the same iron pan on which the bhakri is made, this chutney, or Pithale, or Mirchi Kharda (Green chili chutney) are made. I feel its such an efficient way of cooking.

Bhakri on the chulha

I love growing vegetables and every summer when the tomatoes are growing in the garden, I look forward to making this recipe. My Mom says, the perfect tomato should be not 100% green, it should have a tinge of yellow. So I make sure I pick such tomatoes for the chutney.

I pick green ones to make Fried Green tomatoes, Louisiana style

The recipe is super simple but I guarantee you will love it

Solapur style Green tomato chutney

Super easy to make recipe using fresh green tomatoes that packs a flavor

Course Appetizer, condiment
Cuisine Indian, Maharashtrian
Keyword Chutney, Green tomatoes, spicy chutney

Ingredients

  • 1 Tbsp Oil
  • 2 Almost green tomatoes see the details above
  • 5 Green chilies adjust the amount to your taste
  • 2 Garlic cloves
  • 1/2 Tsp Turmeric
  • 1 Tsp Salt
  • 2 Tbsp Roasted Peanut Powder

For the Tempering

  • 1 Tbsp Oil
  • 1 Tsp Cumin Seeds
  • 1/2 Tsp Turmeric
  • 1 Tbsp Chopped cilantro

Instructions

Chutney

  1. Heat the oil in the pan

  2. While the oil is heating, chop the tomatoes in medium size pieces. Chop garlic and green chilies in big pieces

  3. Add turmeric to the oil

  4. Add the chili and garlic to the oil, make sure the oil is not too hot. We don’t want any color on the garlic or the chilies. We just need to soften them

  5. Add tomatoes and sauté on medium heat. Add salt.

  6. Cover and let the chili, garlic and tomatoes soften

  7. Now using a pestle mash the ingredient to a coarse consistency right on the pan. You can also use a blender or mortar pestle to do this. You can want to have a coarse texture and not a paste

Make the tempering

  1. In a small pan, heat the oil. When the oil is hot, add the cumin seeds and turmeric.

Assembly

  1. Add the peanut powder and the tempering to the tomato mixture

  2. Garnish with chopped cilantro

Categories
Curry Daal Gluten-free Healthy foods Indian Lentils Low carb Maharashtrian Protein salad Vegan Vegetarian

Pendpala- a dry masoor daal curry

Daal or lentils are an integral part of the Indian cuisine. Its used in many forms, with skin, without skin, powdered, roasted, raw and so much more. In parts of India where the water is scarce, not enough fresh vegetables, you will see a predominant part of region’s cuisine. If you visit Rajasthan, the western state of India, you will see so many dishes that made with Chick pea flour, like Gatte ki kadhi, Kachori etc.

Hearty Solapuri meal

Solapur, the town I come from is situated in the middle of state Maharashtra. There are no rivers or water bodies near Solapur and the summers are brutal. All of this means that the cuisine relies on shelf stable ingredients more than the fresh vegetables or fish. You will see use of Jowar and Bajra more than the wheat and rice. Jowar and Bajra and drought tolerant and need much less water than growing wheat or rice.

Millets like Jowar or Sorghum and Bajra or pearl Millet are excellent source of nutrients. They provide lots of essential nutrients not only to the human beings but it’s also gentle on the soil

Typically farmer, or those who do lot of physical labor, and come from neighboring villages for work, often pack a hearty lunch of Jowar Bhakri, peanut chutney and some dry subji. The subji is dry which prevents it from getting soiled in the hot weather of solapur. Often times it has lentils or chickpea flour

One such preparation is Pendpala. I don’t know how the name came about but I can guarantee you, it’s plain delicious. Full of protein, it’s is a a great compliment to the bhakri and completes the meal

I love that all of the ingredients needed to make this are shelf stable and easily available.

What makes it absolutely delicious is the Kala Tikhat, a special spice mix from Solapur. It’s a combination of many whole spices, along with onion and garlic. I will share that recipe soon. It’s made a few times a year and can be used in many recipes.

I learnt this from Anusaya. Anusaya is help at home but she is much more than that. She is family. She has been coming to our house for the last 45 years. I have rarely seen even family members as loyal as she is 🙂

Kala Tikhat

Some people call it Daal Kanda, which translates to Lentil Onion, and some also make it with toor daal. I make the Pendpala with Masoor daal and serve it with sorghum bhakri, peanut chutney, Green Tomato chutney and raw onion. A complete, balanced, wholesome, protein packed, gluten-free vegan meal 🙂

Masoor Pendpala Solapur style

Spicy, delicious lip smacking daal recipe, easy to make

Course Appetizer, Side Dish
Cuisine Indian, Maharashtrian, vegan, vegetarian
Keyword daal, lentils, vegan, vegetarian

Ingredients

  • 1 Cup Split masoor daal
  • 1 Onion Chopped
  • 2 Garlic cloves
  • 2 Tbsp Oil
  • 1 Tsp Turmeric Powder
  • 1 Tsp Salt
  • 4 Tbsp Roasted peanut powder
  • 1 Tbsp Chopped cilantro
  • 1 Tbsp Kala Tikhat
  • 1/2 Tsp Red chili powder optional

Instructions

Prep

  1. Soak the daal for 20-30 mins

  2. Drain the water

Cook

  1. Heat the oil in a wok. Add turmeric, and chopped onion and garlic.

  2. Cook the onions and garlic till soft, ensure that its not too burnt

  3. Add the drained daal, salt and stir to mix

  4. Cover and cook till the daal is soft on low-medium flame . We dont want it to be mushy. It should be cooked but hold its shape. It takes about 8-10 mins

  5. Add kala tikhat and red chili to taste

  6. Add peanut powder , cilantro and mix well

  7. Serve with Bhakri

Categories
Appetizer Healthy foods Indian Maharashtrian Side dish Snack Vegan Vegetarian

Kairchi Daal

Gudhi padwa is celebrated in Maharashtra, India as a new year. Across India the same day is celebrated by different names but the spirit is the same. We look at nature, and you can see that spring is in the air and this day is the celebration of the new beginnings. Bengali celebrate ‘poila boishokh’ , Keralite celebrate Vishu and so much more.  Not just in India but even Zoroastrians celebrate ‘Nowrouz’ which marks the first day of the spring. On this day they have a platter newly sprouting wheat is always on the table along with other things. 

I feel you feel like celebrating if you just look around. Where I live, there are beautiful blossoms everywhere, when I go for a walk, I see beautiful wildflowers, mustard fields with yellow flower and just a sense of rejuvenation. 

We went for a beautiful hike in a state park and saw so many beautiful wild flowers, it was just breathtaking. 

I picked a few of these and decided to make a Gudhi using those. 

In India, especially in Maharashtra we celebrate Navratri which starts on Gudhi Padwa. Often there are Haldi Kunku which is a gathering for women, an informal social gathering. The celebration is for a goddess and I remember very fondly my Aai coming up with amazing ideas for decorations. One year we had recreated a famous garden from southern india, another year was a beautiful swing made with flowers and plants. As a kid I loved helping Aai with this event.

This is also the season when you start seeing Green mangoes on the tree in India. So naturally traditionally two dishes using the green mango are always made for this haldi kunku, Aam Panhe, a drink made with cooked green mango & jaggery and the second is this , Kairichi Daal.

I love both of these things very much. Today when I picked up the green mango to make this, it turned out not very sour but the kiwis I picked up from the farmers market were so sour, so voila, a new dish is born. I added some Kiwi and the results were quite delicious.

It a super easy recipe, hope you guys like it. If you have any such traditions, I would love to know about them. 🙂

I have also written the recipe in Marathi, hope thats useful to some.

Kiwi Green Mango Lentil Salad

This is a typical dish made during the spring while the mangoes are still green and tart. Soaked lentils add a perfect crunch to this salad

Ingredients

साहित्य

  • 2 Cups Chana Daal
  • 1/2 Cup Peeled and grated Green Mango
  • 2 Kiwi Peeled and chopped
  • 3-4 Green Chili paste
  • 1 Tsp Salt
  • 1 Tbsp Sugar
  • 1/3 Cup Freshly grated coconut
  • 1-2 Tbsp Chopped mint leaves
  • 1 Tbsp Chopped cilantro

For tempering

  • 3 Tbsp Oil
  • 1 Tsp Mustard seeds
  • 1 Tsp Cumin seeds
  • 1/4 Tsp Asafetida
  • 3 Dry red chilies
  • 1 Sprig Curry leaves

Instructions

Method

  1. Soak the lentils for 4-5 hours at the least 

  2. Drain and crush them in mortar pestle, make sure you don’t make a fine paste

  3. Mix sugar, salt, coconut, mint, cilantro in the crushed lentils. Once its completely mixed, add the kiwi and green mango. 

  4. Heat oil in a pan. Check if its hot by adding a couple of mustard seeds, if they splutter add the rest of the ingredients and saute for 30 secs. Make sure it does not burn 

  5. Add this tempering to the lentil mixture. The salad is now ready 

  6. Serve at room temperature

Categories
bread Indian Maharashtrian Snack Vegetarian

Mumbai Pav

The first thing I do when I land in Mumbai the first thing I do is have a cup of cutting chai, you know I am super crazy about Chai, I probably have 4-5 cups everyday.

The second thing I do is have Vada Pav. I have fond memories of traveling in the train and eating Vada Pav, served with spicy sautéd green chili and garlic chutney. I have a recipe for Vada Pav

Vada Pav is a popular street food in Mumbai, in fact Mumbai has amazing street food in general. Pav Bhaji, Pani Poori, Vada Pav, Tawa pulav, Ragda Pattice, Kutchi Dabeli, the list just goes on and on. When you talk about food like Kutchi Dabeli, Vada Pav, Pav Bhaji, you quickly realize that Paav/Bread is a critical element for these.

Kutchi Dabeli

In Mumbai this bread is called Laadi Paav. Laadi is the tiled floor, when you see the sheets of this bread, you understand why it gets that name.

The bread came to India with the Portuguese, as I was reading more about this it seems like this Laadi Paav is similar to the Portuguese bread, Papo Secos. When I visited my sister in Miami, I tasted a Cuban bread, Pan De Agua and it was very smilar to the Ladi Paav.

My family is crazy about Pav Bhaji and Kutchi Dabeli, I end up making these at least twice a month if not more. In California I tried using Burger buns, dinner rolls, Kaiser rolls, but nothing tasted like the Paav I was used to eating growing up in India. So I talked to many people, read books, watched videos and came up with a recipe that works perfect for my family, I feel it comes closest to the Paav I have eaten.

Paav is made with simple ingredients like Yeast, Flour, Sugar and water. When I talked to some of the bakeries, I was told that its a poor man’s food so no fancy ingredients like Milk Powder or milk are used.

The trick is in the process and I feel that these three things are important:

  • High hydration dough- The dough should be quite lose, this allows the yeast to create large air pocket while baking.
  • Gluten formation- The dough needs to be kneaded so that strong gluten forms which can stand up to those air pockets while baking.
  • High temperature baking- Baking at high temperature for a shorter time is critical to get that crust.

I feel bread making is just as much an art as science, do even though I have given the exact recipe, I have also made a video which shows all the steps in detail.

Once you master this, you will be able to make them at home with the ingredients of your choice, I use unbleached organic flour and organic butter.

Ladi Pav

Pav Bhaji, Batata vada or kutchi dabeli, these all dishes are incomplete without a perfect Paav. This easy to make recipe will remind you of the Ladi pav from Mumbai.

Course bread, Snack
Cuisine Indian, Maharashtrian
Keyword Ladi Pav, Paav, pav, pavbhaji, vadapav
Prep Time 20 minutes
Cook Time 10 minutes
2 45 minutes
Total Time 30 minutes
Servings 6

Ingredients

  • 190 gms Water About 3/4 and a little more
  • 7 Gms Instant Yeast About 2 1/4 Tsp or 1 packet
  • 2 Tbsp Sugar
  • 250 gms All Purpose Flour
  • 3 Tbsp Unsalted Butter melted
  • 1 Tsp Salt

Instructions

  1. Heat the water to 100F. I use a thermometer to check because this is critical for the yeast to rise.

  2. Add sugar and yeast and set aside for 5 mins

  3. Add melted butter to the flour and mix. Add salt and mix it a little more. 

  4. By now the Yeast mixture should be frothy, this shows that the yeast is active

  5. Add the yeast mixture to the flour and mix until it comes together. 

  6. Now take the mixture on the counter and knead for good 10 mins. Don’t be alarmed if the mixture is wet, as you knead you will see that it comes together. 

    Dont be tempted to add more flour. Lose dough is key to a fluffy and soft bread

  7. Put the dough in a greased bowl, cover and let it rise for about 50- 60 mins. The dough should double, so if the temperature is cold, let it rest for 60 mins

  8. After 60 min, take the dough on the counter, deflate and knead for 3-4 mins

  9. Divide in 12 equal pieces. I use a scale. Equal balls ensure that the bread is of same size and also cooks uniformly

  10. Grease and dust with flour a 9×13 pan. I use the Wilton Brownie pan. 

  11. Roll the dough pieces in a tight ball and arrange in the pan. Make sure when you roll, you are making the surface taught, and also the seam side should be down. This ensure that when the dough rises, all air gets nicely trapped, making for a spongy bread

  12. Let the balls rest anywhere from 60-75 min. They should be visibly plump

  13. Heat the oven to 450 F

  14. Bake the bread for 8-10 mins. After 10 mins even if the crust does not look super dark brown, dont be tempted to bake longer

  15. Take the pan out and immediately brush with a little butter

  16. Cool on the baking rack. 

  17. Enjoy the Paav is ready

Recipe Video

Categories
Appetizer Fusion Maharashtrian Snack Vegetarian

Sweet Potato Hasselback Dabeli

I love street food. I feel that is an easy, fast and cheap way to experience the local cuisine. Anytime I travel to a new place, I make sure I visit the local markets and enjoy the street food. In India street food changes from town to town. When you are in Mumbai, you get to enjoy amazing Vada Pav, Pav Bhaji and of course Dabeli.

Dabeli which translates into ‘pressed’ is one of my favorite street foods. It is believed to have originated from the Kutch region of India and also known as Kutchi Double Roti. I still remember eating one of the best dabelis when I visited my cousin in Mulund, Mumbai.

Yashwant Dabeli in Pune

I will write a post and share a recipe for Dabeli soon but today’s dish is all about Hassleback. Hassleback potatoes are a fun way to cook, and dress up an otherwise boring potato. I am not the greatest fan pf potatoes however I love sweet potato.

Sweet potatoes are a great source of complex carb along with many nutrients like Vitamin A, C and B making it a power house. It lends it self well to sweet and savory dishes. Sweet potato gnocchi , to pie to fries and so much more. So I try to incorporate Sweet potatoes in our diet when I can.

When I visited Delhi, I really enjoyed the road side snack of roasted Sweet potato sprinkled with some chaat masala. I love the earthy flavor. In fact winter is the best time to visit Delhi. If you happen to be there, I would highly recommend doing a Food tour of Old Delhi with my friend Anubhav with Delhi Food walks.

Today’s dish is inspired by my travel to Delhi and Mumbai, my love street food. It’s easy to make, its healtheesh and looks impressive. You can play with the many flavors or spices that you might have in our pantry, can not go wrong.

Sweet Potato Hasselback Dabeli

Course Appetizer, Snack
Cuisine American, fusion, Indian
Keyword dabeli, easy to make, hassleback, kutchi, potato, snacks, sweet potato
Prep Time 10 minutes
Cook Time 1 hour
Total Time 1 hour 10 minutes
Servings 2
Author Anagha

Ingredients

  • 2 Sweet Potatoes Try and pick long and narrow ones
  • 1 Tsp Kosher Salt

Spice Butter

  • 4 Tbsp Unsalted Butter
  • 2 Tbsp Dabeli Masala You can use a market bought or make at home

Garnish

  • 1/2 Cup Pomegranate Arils
  • 1/2 Cup Spiced peanuts I will share my recipe soon
  • 1/3 Cup Fine Sev
  • 4 Tbsp Chopped Cilantro

Instructions

Preheat the oven to 450 F

    Prepare the potatoes

    • Scrub and wash the potatoes the potatoes
    • Slice the potatoes thin leaving about 1/4 inch at the bottom uncut. You can use two chop sticks or even wooden spoons to guide the knife and prevent it from cutting it all the way through.

    Spiced butter

    • Heat the butter in a sauce pan till just melted. Turn off the heat and add the Dabeli spice mix. 

    Assembly

    • Take a baking sheet or a overproof pan, I like using a cast iron pan
    • Arrange the potatoes on the sheet with the cut side up
    • Brush on half of the  butter mixture, making sure to get in between all the slices. 
    • Bake until tender and crisp, 45- 50 minutes.
    • Take out of the oven, and brush the remaining butter mixture and bake for another 20-25 mins.

    Garnish

    • Place the potatoes in a serving dish. Drizzle the date chutney and mint chutney 
    • Sprinkle some cilantro, pomegranate, Spiced peanuts and the Sev
    Note:  
    I have made a small video of how to cut the potatoes in thin slices without cutting it through. Here it is. 
    Categories
    dessert Indian Maharashtrian Main Dish Rice Vegetarian

    Narali Bhaat

    Narali Bhaat

    If you notice coconut is used extensively in Maharashtrian cooking, especially in the costal  cooking. Same three ingredients, fresh coconut, Jaggery and rice are used to create a variety of desserts.

    Modak

    You take the rice flour, fresh coconut and jaggery, with a little bit of steam you turn it into this delicious dumpling, Modak. Modak are made specially for Ganesh festival as those are Bappa’s favorite.

    Patole

    You take the rice flour, make pancake with it. Stuff it with a earthy mixture of fresh Coconut, jaggery and some aromatic spices like cardamom and poppy seeds, That turns into patole. The same are also found in Kerala

    Sandane

    Soak the rice, grind it coarsely, makes some jaggery and coconut, steamed the whole make sure to make something like a pudding which can be enjoyed with sweetened coconut milk, it’s called Sandane. Sometime you can also add jackfruit pulp, I love that variation a lot

    Ghavan Ghatale

    A pancake is made with rice flour and eaten with coconut milk sweetened with jaggery

    As you can see that traditional recipes use ingredients that are local, which is why I love cooking these recipes and sharing with everyone.

    Today’s recipe is no different, it uses these very simple basic ingredients and turns into this comforting delicious dessert.

    Rakshabandhan/ Narali Poornima

    The fisherman community does not fish during the monsoon months. They treat the sea as their God and let it rest for those four months. Its on this day that they restart the fishing. They sing songs, dress up and offer coconut as an offering to the sea.

    On this full moon the fisherman community celebrates with praying to the ocean God and offer him a special treat of this rice. Since the rice is heavily flavored with coconut, it’s called Narali bhat and the full moon is called Narali(naral=coconut) Poornima( poornima=full moon 🌝)

    Narali Purnima

    This is also the day when most of the Indians celebrate ‘Rakhi Poornima’. The word is based on the word, ‘ Raksha’, which means protection. It is believed that the sister ties this colorful thread, Rakhi on her brothers wrist as a thank you for protecting her. The brother makes a promise to take care of her.

    Now a days it’s a celebration of sibling’s love and I absolutely adore that. We are three sisters and the youngest brother, and on this day we remind each other of the love we share and promise to be there for each other.

    This year we could not be together for celebrating this festival but I at least tried to celebrate with this special bhaat and shared it virtually with them.

    Here is the recipe!

    Narali Bhaat

    A sweet rice dish with coconut and jaggery, flavored with saffron.
    Course Dessert, Main Course
    Cuisine Indian, Maharashtrian
    Keyword easy to make, gluten-free, vegetarian
    Author Anagha

    Ingredients

    Ingredients

    • 1 cup Basmati Rice
    • 2 cups water
    • 1 pinch of salt
    • 4 Cloves
    • 4 Green Cardamom
    • 4 tbsp Clarified Butter/ Ghee
    • 8-10 Cashew split in halves
    • 1 Tbsp Saffron dissolved in 1 tbsp milk
    • 1 cup Freshly grated coconut
    • 3/4- 1 cup Jaggery

    Instructions

    1. Soak the rice for 15-20 mins in cold water. Drain and set aside

    2. Heat 2 tbsp ghee in a heavy bottom pan

    3. Fry the cashews and set aside

    4. Add cloves and cardamom and saute for a min

    5. Add drained rice and saute for another min

    6. Add the boiling water to the rice and stir

    7. Add a pinch of salt, bring it to a boil and cover

    8. Let the rice cook till all the water is absorbed.

    9. Once the rice is cooked, spread it on a plate to cool

    10. Mix coconut and jaggery and cook till the jaggery melts and the mixture comes together

    11. Add the cooked rice and mix with very gently

    12. Cover and let it steam for 5-7 mins

    13. Add the remaining ghee and saffron milk and mix well

    14. Add the fried cashews and serve

    Categories
    Appetizer Healthy foods Indian Maharashtrian Main Dish Mexican Vegan Vegetarian

    Pulled Jackfruit Taco with Sugarcane tortilla

    As you know I love cooking with what’s in season, go visit the local markets, pick up some produce, get some inspiration, bring it back to the kitchen and make something fun. This time when I visited India in Summer, although it was ultra blistering hot, I mean we are talking 108F and 90F at night, it did not stop me from going to the market.

    I picked up some raw jackfruit, mangoes from the market and on the way home stopped off to grab a drink of fresh sugar cane juice. As I was driving home, I started thinking about my summer vacations growing up.

    It used to be super hot where I grew up, but we still enjoyed our afternoons. A everlasting game of monopoly, carom board, playing cards and endless conversations were so much fun. Every summer we also visited my Nani (maternal grandma). She lived in Mumbai and the train ride to her place used to be another event we looked forward to every summer.

    My Mom is a great cook and an amazing planner.  So she would pack perfect food for all our train journeys. One of the dishes was this roti/poli/tortilla made from sugar cane juice, called ‘Rasachi Dashmi’.  It not only tasted awesome but was perfect for the train journey as it stayed good without any refrigeration and tasted great cold.

    My nani would always have alphonso  mangoes waiting for us along with other things from konkan and she would make the best Poli in the world. We would devour the mangoes with poli and ghee.

    Kokam, Tadgola and so much more. Fragrant yellow jackfruit would fill the air. I will share more recipes using the ripe or yellow jackfruit soon.

    One of those things was raw/green jackfruit. She would make the best bhaji with it, with lots of red chilies and tender cashews.

    My nani is no more, but her memories I cherish through various foods. My kids are not so lucky to just hop on a train and visit their Nani, my Mom. The 10K miles is a long distance to cover. But we always take family trips in vacations, sometimes local, sometimes even staycations but always make time for family.

    I know how important it is to spend time and make memories. We are all big time foodies so more often than not the destinations are picked based on the variety of food we get to eat. We love to explore local cuisines and produce, always a local market visit is included in the vacation plan.

    One of the favorite destinations is Mexico, I just love Mexico. Its nice and warm, people are very friendly, I can speak the language and most of all, amazing food. I can visit Mexico many times and nto get tired.

    Mexican food is probably my second most favorite food after Indian food. Whenever we visit Mexico, II make sure we go to the local markets and try some amazing dishes. Last time we visited this restaurant in Maztlan, El Precidio and everything there was incredible.

    I love Mexican food as it highlights seasonal produce, perfect balance of spice, sweet, savory and just satisfying meal. I love the use chilies in many ways, I love how they use traditional cooking methods to get some complex flavors in dishes like Mole.

    One of the most commonly known Mexican foods is Tacos. Simple yet flavorful, incredibly versatile.

    Today’s dish is inspired by the  summer vacations, both mine and my kids’s and its tribute to the local produce.

    Pulled Jackfruit Taco with Sugarcane juice tortilla

    [yumprint-recipe id=’8′]

    I would love to know about your summer memories and foods. Please share in comments.

    Categories
    Breakfast Indian Maharashtrian Snack Vegetarian

    Dahi Sabudana- tapioca pearls with spiced yogurt

    Spring/summer  is here. The rain gods have been kind and hence all the mountains around where I live are still green.  Near my home there is a barn and they bring out their sheep for grazing at this time, with the rolling hills, and the sheep,  it feels like Swiss countryside.
    In India, we celebrate Holi. During holi a effigy of a demoness is burnt in fire. This demoness symbolizes all the mean thoughts, all the resentments that one might be carrying, you burn it all in the fire of Holi.  This is the time when we celebrate New Year according to the lunar calendar. Interestingly around the same time Parsi’s and Iranis’s also celebrate Navrouz, which translates to ‘New Day’. In short its all about starting afresh, leaving all the baggages that you might be carrying and focus on the future.

    In India we have Navratri ( which translates to ‘9 nights’) twice a year. Interestingly they both fall when the season changes from hot to cold and cold to hot. One is in spring time and one in fall. During this time you fast, you don’t eat meat, regular vegetables, no cereals. I think it is very much needed, it gets your body time to adjust and also get ready for the new season. Its like a cleanse, where you eat light foods, people also try not to eat garlic & onion.


    Each region in India has its own rules of what to eat and what not to eat during these nine months, some eat spinach, some eat tomatoes, others don’t. A few things like tapioca, water chestnut, sweet potatoes, cucumber are eaten across the country.

    I come from Maharashtra where Sabudana Khichadi is very popular. I recently did an Insta story on it. Whenever I ask my kids what they want special for breakfast, the answer is Sabudana Khichadi . My husband can eat bowls of it. I normally end up making enough so I have leftovers as he likes to eat it the next day again.

    Everyone knows Sabudana Khicadi but might not know this recipe. My mom makes it so well, my sister can eat bowls of it for days and not get tired. I like it more than Khichadi because it feels kind of cooling and I love yogurt 🙂

    Dahi Sabudana

    Ingredients:

    • 2 cups tapioca pearls ( you can get them in any indian grocery store)
    • 3-4 green chilies ( I use the thai chilies that are super spicy)
    • 1 1/2 tsp Cumin seeds
    • 1/3 cup roasted peanut powder
    • 1 cup buttermilk (if you can not get buttermilk, you can churn 1/2 yogurt with 3/4 cup water)
    • 1 cup
    • salt to taste
    • 1 tbsp sugar
    • 2 tbsp chopped cilantro

    Method

    • Dry roast sabudana/tapioca
    • After it is cooled down, soak in some water for about 30 mins
    • Pound the cumin seeds and chilies to make a coarse paste. I prefer using mortar pestle but you can also use a chopper
    • After 30 mins, drain all the water and soak in buttermilk for at least 4-5 hours.
    • Now add yogurt ( preferably whole milk), roasted peanut powder, chili-cumin mixture and salt n sugar to taste.
    • Garnish with cilantro

    Note:

    • You can also cook the sabudana in water until it is translucent ( instead of roasting and soaking in buttermilk).
    • Mix it with yogurt, roasted peanut powder, salt, sugar and the chili cumin mixture. You can also  add tadka of ghee jeera mirchi if desired
    • Garnish with cilantro
    Categories
    bread Fusion Jewish Maharashtrian

    Til-Gul Babka Jewish Indian bread

    Nothing is more appetizing than the smell of freshly made bread. Be it the fresh roti that is made right on the stove top or a loaf of bread baked in the oven.. it calls everyone to the kitchen and around the dining table. I am not much of a baker, I do bake cakes occasionally but it does not come to me naturally. I feel cakes are way easier than the breads, when you start baking breads, you are going closer to the science than art.

    After MasterChef, one of the goals has been to bake more often and since my family is not too much into the cakes, and I like to challenge myself, I am planning to bake more breads and try new techniques.

    January is one of my favorite months. This is the month of resolutions, new beginnings and many more things. One of the things is Hurda, its my most favorite thing on this face earth, and this is the time we celebrate Sankranti. This is the only festival in Maharashtra that is based on a Solar/Gregorian calendar, rest of them are all lunar calendar based. Sankranti is celebrated on the 14th of Jan, and other parts of India celebrate this festival with different names, Pongal in southern India, Bihu in Eastern India, Uttarayan in Western India and Lohri in Northern India.  The common theme is great food and happiness and most of the  sweets  are made from Sesame seeds and Jaggery. Both these foods create ‘heat’ in the body and hence eaten during this winter season.

    Going back to my baking breads, as you know, I love combining flavors. I had seen this sesame bread recipe on pintrest and that is also my source of inspiration today.So I decided to make this bread which is fit for the Sankrant and something new. Here it comes;

    Til Gul Babka


    img_8957-2

    I know right, it sounds crazy but tasted yummy, if you are into sweet breads, you might want to give it a try. This recipe is quite versatile and can be easily made into a savory bread as well, all you have to change is the filling and you are good to go.

    I had read about this technique of ‘Tangzhong‘ and decided to try using it with this bread. I think it definitely helped keep the bread very moist. Tangzhong is a a Japanese technique, it makes for a very sticky dough that is very tricky to handle, but thats what makes for the very soft final product.

    Tangzhong is nothing else but a paste made with flour and water, you cook it to almost a roux like consistency. You cool it and mix it in the dough.It sounds so simple and it is, but let me tell you, it created incredibly soft almost pillowy bread.

    I think I am so in love this technique that I think I will end up using in everything I bake. 🙂

    Back to the recipe

    Ingredients

    Tangzhong

    • 50 g  Flour
    • 1 cup milk

    Bread dough

    • 350 g Bread Flour ( about 3 cups)
    • 1/2 salt
    • 65 g sugar ( about 1/4 cup)
    • 1 egg
    • 1/2 cup warm Milk
    • 2 tsp Yeast
    • About 1 cup Tangzhong
    • 1 egg for egg wash

    Filling

    • 1/2 cup Crushed Jaggery ( you can use dark brown sugar if you can not find jaggery)
    • 1/3 cup roasted peanut
    • 4 tbsp roasted sesame seeds
    • 1/4 tsp cardamom powder
    • 2 tbsp molasses
    • 4-5 Tbsp ghee ( or softened unsalted butter)

    Method

    Making Tangzhong

    • Mix in the water and flour to form a good slurry
    • Cook it on low flame till it thickens. It should be a little less thick that a mashed potatoes. One way to check is if you stop stirring, does the mixture stays in circles and you can see the bottom of the pan
    • Take it off the heat, cover with a plastic wrap, making sure it touches the surface of the paste. This will ensure that no crust forms
    • Cool the Tangzhong to use later

    Making the filling

    • Grind all the ingredients except the ghee and molasses
    • Mix the powder in ghee and molasses to make a paste

    Making the dough

    • Warm up the milk and add the yeast. Leave it aside for 10-15 mins for it to foam up
    • Until then mix, Flour, Salt, sugar, sesame seeds
    • Add an egg and mix
    • Now add the yeast and milk mixture and mix for 30 secs
    • Add the tangzhong that is cooled
    • Now knead the dough in the stand mixer for 10-15 mins
    • Keep adding softened butter while the mixer is running
    • The dough will be a very wet dough, don’t worry. If the dough sticks to the bottom of the bowl, don’t worry
    • Take a greased bowl and transfer the dough.Let the dough roof for at least 2 hours.
    • I like to proof my dough in the fridge, so I can use it when I am ready
    • The dough should double in size

    Assembling it together

    • Punch and deflate the dough
    • Roll it into a reactangle
    • Spread the filling evenly

    Shaping the bread

    • Take the rolled log and cut it along the length with a sharp knife
    • Twist the two parts together to form a braid keeping the cut side up
    • Take a bread loaf pan that is greased and lined with a parchment paper
    • Add the dough in it and let it rest for at least 60 mins

    Baking

    • Heat the oven at 350 F
    • Brush the dough with egg wash and bake for 25-30 mins in a 350F

    Note:

    1. This dough was a little more than a standard bread loaf can handle, so I removed about 1/3 cup dough before shaping it
    2. If you can not find molasses, you can substitute with honey

    img_7265


    en_USEnglish