Categories
dessert Drinks & Coolers Fat Free Fusion Gluten-free Indian Italian Vegan Vegetarian

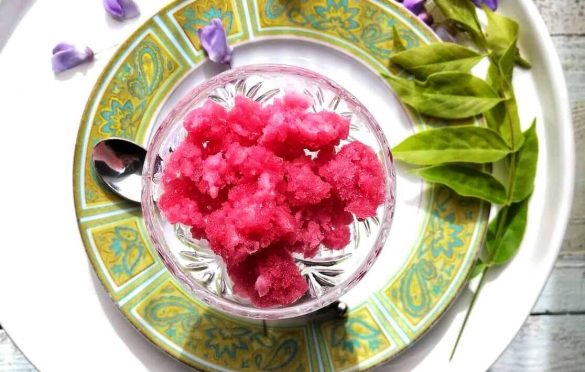
Kokum Granita

Summer is almost here  and I have all these amazing memories of different summer vacations I have taken.

I remember waking up to beautiful mornings with the birds were chirping, and scent of various flowers filled the air. One of the birds was called Tambat, which translates to Coppersmith. It makes a sound of a hammer beating down a sheet of copper, I guess that’s where it got its name from. After waking up we would wash up, I still remember those big copper earns filled with water.

My Mami a typical woman from Konkan, unadulterated love, simple life and always a smile on her face that’s how I remember her. She would make beautifully scented rice porridge  which would be served on a giant leaf of a Moochkund tree, which is also called ‘dinner plate’ tree. It was simply dressed with a touch of ghee and salt.

Muchkund Leaves

There were bounties of summer like Karvande, Jambhul, but best part about that vacation used to be mangoes, mangoes for breakfast ,Mangoes for lunch, mangoes for snack Mangoes for a drink, what more can one ask for. I still remember very vividly the room full of mango is layered beautifully on a bed of hay. My aunt would tell us to go look for the ones that are ripe and then the party started.

We would wander around in the village, on the paths paved with Chire, a red stone from that region, leading up to the temple. There was a small pond near the temple called Ban Ganga, we would explore around and head home when the stomach started growling.

Mami would have a drink ready for us, made from the Kokum or ratamba as its called in that region. Gorgeous garnet, ruby color, delicious taste and thirst and heat quenching, this used to the the perfect treat after a walk in the village.

Kokum Sherbat

Fast forward to 2018 when I went to Sicily with my family. I fell in love with Italy and would love to live there some day. We enjoyed some amazing foods and a few of the favorites originated in Italy. Cannoli, Arancini to name a few. One of those dishes is Granita, a refreshing icy treat that comes in all kinds of flavors. It so reminded me of the Barf Gola we get in India.

Gelato

The best part was that the granita is enjoyed at breakfast with brioche, dessert for breakfast, what more can one ask for.

So today’s recipe is my summers relived, Kokum granita showcases two of my favorites, konkan and Sicily.

Kokum Granita

A refreshing summer dessert with tangy and sweet flavors

Servings 4

Ingredients

Ingredients

  • 3/4 cup Kokum Agal without sugar
  • 2 1/2 cups of water
  • 1 1/2 cup sugar
  • 1 tsp Cumin powder
  • 1/2 tsp salt

Instructions

Method

  1. Bring 1 cup of water and sugar to a boil. Keep stirring till sugar dissolves.
  2. Keep aside. Stir in the rest of the water. Taste and add more sugar if needed
  3. Add cumin powder and salt and stir.
  4. Put this mixture into a baking tray, keep it in fridge for 2-3 hours. The mixture will start freezing around the edges slowly. Take the tray out and scrape the frozen part with fork, and put it back in the freezer.
  5. Keep repeating till all of the mixture is frozen into fine ice.

Serve it in a bowl.

Recipe Notes

You can make this a couple of days ahead, just make sure to scrape it with a fork right before you serve

You can also serve it with cream or ice-cream 

You can serve it at breakfast with brioche 
Categories
bread Indian Maharashtrian Snack Vegetarian

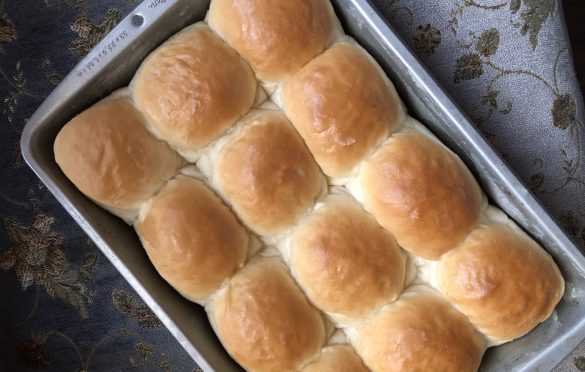
Mumbai Pav

The first thing I do when I land in Mumbai the first thing I do is have a cup of cutting chai, you know I am super crazy about Chai, I probably have 4-5 cups everyday.

The second thing I do is have Vada Pav. I have fond memories of traveling in the train and eating Vada Pav, served with spicy sautéd green chili and garlic chutney. I have a recipe for Vada Pav

Vada Pav is a popular street food in Mumbai, in fact Mumbai has amazing street food in general. Pav Bhaji, Pani Poori, Vada Pav, Tawa pulav, Ragda Pattice, Kutchi Dabeli, the list just goes on and on. When you talk about food like Kutchi Dabeli, Vada Pav, Pav Bhaji, you quickly realize that Paav/Bread is a critical element for these.

Kutchi Dabeli

In Mumbai this bread is called Laadi Paav. Laadi is the tiled floor, when you see the sheets of this bread, you understand why it gets that name.

The bread came to India with the Portuguese, as I was reading more about this it seems like this Laadi Paav is similar to the Portuguese bread, Papo Secos. When I visited my sister in Miami, I tasted a Cuban bread, Pan De Agua and it was very smilar to the Ladi Paav.

My family is crazy about Pav Bhaji and Kutchi Dabeli, I end up making these at least twice a month if not more. In California I tried using Burger buns, dinner rolls, Kaiser rolls, but nothing tasted like the Paav I was used to eating growing up in India. So I talked to many people, read books, watched videos and came up with a recipe that works perfect for my family, I feel it comes closest to the Paav I have eaten.

Paav is made with simple ingredients like Yeast, Flour, Sugar and water. When I talked to some of the bakeries, I was told that its a poor man’s food so no fancy ingredients like Milk Powder or milk are used.

The trick is in the process and I feel that these three things are important:

  • High hydration dough- The dough should be quite lose, this allows the yeast to create large air pocket while baking.
  • Gluten formation- The dough needs to be kneaded so that strong gluten forms which can stand up to those air pockets while baking.
  • High temperature baking- Baking at high temperature for a shorter time is critical to get that crust.

I feel bread making is just as much an art as science, do even though I have given the exact recipe, I have also made a video which shows all the steps in detail.

Once you master this, you will be able to make them at home with the ingredients of your choice, I use unbleached organic flour and organic butter.

Ladi Pav

Pav Bhaji, Batata vada or kutchi dabeli, these all dishes are incomplete without a perfect Paav. This easy to make recipe will remind you of the Ladi pav from Mumbai.

Course bread, Snack
Cuisine Indian, Maharashtrian
Keyword Ladi Pav, Paav, pav, pavbhaji, vadapav
Prep Time 20 minutes
Cook Time 10 minutes
2 45 minutes
Total Time 30 minutes
Servings 6

Ingredients

  • 190 gms Water About 3/4 and a little more
  • 7 Gms Instant Yeast About 2 1/4 Tsp or 1 packet
  • 2 Tbsp Sugar
  • 250 gms All Purpose Flour
  • 3 Tbsp Unsalted Butter melted
  • 1 Tsp Salt

Instructions

  1. Heat the water to 100F. I use a thermometer to check because this is critical for the yeast to rise.

  2. Add sugar and yeast and set aside for 5 mins

  3. Add melted butter to the flour and mix. Add salt and mix it a little more. 

  4. By now the Yeast mixture should be frothy, this shows that the yeast is active

  5. Add the yeast mixture to the flour and mix until it comes together. 

  6. Now take the mixture on the counter and knead for good 10 mins. Don’t be alarmed if the mixture is wet, as you knead you will see that it comes together. 

    Dont be tempted to add more flour. Lose dough is key to a fluffy and soft bread

  7. Put the dough in a greased bowl, cover and let it rise for about 50- 60 mins. The dough should double, so if the temperature is cold, let it rest for 60 mins

  8. After 60 min, take the dough on the counter, deflate and knead for 3-4 mins

  9. Divide in 12 equal pieces. I use a scale. Equal balls ensure that the bread is of same size and also cooks uniformly

  10. Grease and dust with flour a 9×13 pan. I use the Wilton Brownie pan. 

  11. Roll the dough pieces in a tight ball and arrange in the pan. Make sure when you roll, you are making the surface taught, and also the seam side should be down. This ensure that when the dough rises, all air gets nicely trapped, making for a spongy bread

  12. Let the balls rest anywhere from 60-75 min. They should be visibly plump

  13. Heat the oven to 450 F

  14. Bake the bread for 8-10 mins. After 10 mins even if the crust does not look super dark brown, dont be tempted to bake longer

  15. Take the pan out and immediately brush with a little butter

  16. Cool on the baking rack. 

  17. Enjoy the Paav is ready

Recipe Video

Categories
bread Italian

Focaccia with fennel seeds

I love this time of the year, after a long winter when you start seeing flowers blossoming on the bare tree branches, you see birds busy building nests  and the mercury starts going up. So this is the time when I am again motivated to cook a few dishes that need fermentation. In India the weather is always warm and you dont have to think if your batter will ferment or not, or if your bread will rise or not, but here one has to plan. It can be quite frustrating when you plan to make Dosa ( Indian crepe made from ground rice & lentil batter) and the batter does not ferment or when you are trying to make Yogurt and it does not set because you forgot to keep it in the oven and so on.

So as soon as I found out that it is going to be warm I decided to make my favorite Focaccia. I lvoe Focaccia especially when it is topped with sea salt and some fragrant herbs. I like it plain just out of the oven or with some nice vinegar. I love fruity vinegars like Fig Vinegar. There is a shop in the Ferry Building and they have some amazing varieties of Olive oils & Vinegars. I love their Meyer Lemon loive oil with Fig Balsamic…I could eat a whole loaf of bread with that.

IMG_2295

Coming back to focaccia, as you may know I like making things from scratch, I feel it makes me appreciate what I am eating more and appreciate all the efforts when someone makes it for me. I like to bake breads but it does not come naturally. Growing up in India, most of the breads are made without any yeast and don’t require any proofing, so I started baking breads when I came to California.

This is a very simple recipe but needs patience. There may be a shorter way to make this but I like the way this turns out so I don’t mind spending the time. It is funny where I got this recipe. I had gone to London for work and it was frigid cold. I still remember that I went out to grab a bite and I thought my fingers are going to fall off, it was that cold. Anyway, since it was cold I was in my hotel room watching TV. A cooking show came on and how can I forget, it was an Italian Chef. I did not understand what he was saying but he was so cute that I decided to watch the program any way. He had made this focaccia and to my surprise at the end of the show they shared the recipe in English..I have made this recipe quite a few times with variations of toppings and each time it comes out good.

Focaccia with fennel seeds & caramelized onions

IMG_2298

Ingredients:

2 cups of  bread flour ( I have made it with regular flour and it is not bad)

1/2 cup Semolina ( Rava/Sooji)

1tsp salt

1 packet Regular Yeast

3/4 cup water at 75F

1/4 cup olive oil


Method:

Mix all the dry ingredients.

IMG_2275

Add half of the olive oil, add water and knead a soft dough. Knead for 5 mins, this is absolutely critical for the gluten to develop.

IMG_2277
Before First Rise


First Rise: Oil a large bowl and out the ball of dough in it. Cover and keep in a warm place to rise for 45 mins.

First rise
After First rise

Second rise: After 45 mins, take out the dough on a board and flatten it out. Make a sort of envelope and out it back in the bowl for another 45 mins

IMG_2279
Before Second Rise

Second Rise
After Second Rise


Third Rise: After 45 mins, take the dough and place it in the skillet or baking tray you plan to bake it in. Let it rise again for 45 mins

Before Third Rise
Before Third Rise

After Third Rise
After Third Rise

Fourth Rise: You will see that the dough is again doubled. Using the fingers poke holes in eat and spread it around to the edges of the skillet. Spread a couple of tsp of olive oil to keep the dough moist. Let it rise for another 45 mins.

Forth rise
After Forth rise

Bake: Now take a toothpick and pierce the dough in a few places to release the air.  Brush more oilve oil on top. Sprinkle with sea salt & herbs, I used Fennel seeds, crushed red pepper.

Poked with Toothpick

IMG_2292

Bake it at 500F for 15-18 mins until it is golden brown

IMG_2295


Categories
Cakes dessert

Date Cake..butterless, eggless, sugar less

They say there is no such a thing as a free lunch, and there is no such thing as a healthy dessert. If it tastes good, it can not be good for you.

So when I found out that this yummy cake that my mom has been making  is  so healthy, I was very surprised. By the way I don’t know if you know but my mom is an incredible cook. She has been making some amazing recipes, new cuisines, new ingredients and even bakes some yummy things. I remember, our friends would come from school with us and they would be super surprised to know that the cake or cookie they are eating is actually home made, Aai is that good.

Back to the cake, since it eggless, sugar-free and butter free, everyone, even those with dietary restrictions can enjoy the cake. With this cake you can have your cake and not feel guilty. It is a favorite of all the friends and anytime I have made it, it disappears in minutes

This makes an ideal after school snack, lunch box treat or guilt free dessert.

Date Cake

IMG_3598

This cake is butter-less, egg-less, sugar less, made from whole grain and the best part is it tastes yummy.

Date Cake

A delicious cake thats egg-less, sugar-free and can be made vegan. A wholesome snack thats perfect for teatime, school lunches and so much more. Packed with goodness of dates, this cake will please everyone. 

Course cake, Dessert
Cuisine Indian
Keyword cake, dates, egg-less, No Butter, sugar-free
Servings 8
Author Anagha

Ingredients

Ingredients:

  • 25-30 Dates Divided use
  • 1- 1 1/4 cup Milk you need a little more if you use whole wheat flour
  • 4-5 tbsp Sugar optional, I do not add any sugar  since the dates here are sweet
  • 1 cup Whole wheat flour or APF
  • 1/2 cup Oil I use Safflower oil
  • 1 tsp Baking powder
  • 1/4 tsp Baking soda
  • 1 tbsp Walnuts or more if you are crazy about walnuts like me

Instructions

Method

  1. Soak 20-25 dates in warm milk till they are soft . About 3-4 hours is enough for the dates we get here, however you can leave it in the fridge overnight.  Remove the seeds if not using seedless.

  2. Blend them to a smooth paste along with the milk in which it is soaked in.
  3. Add oil and mix.
  4. Sieve together flour and baking soda, baking powder. 

  5. Add the flour one table spoon at a time  to the date mixture and stir.

  6. Chop the remaining dates

  7. Taste and if needed add sugar. Add the nuts, chopped dates and mix.
  8. Preheat the oven at 350F. Bake the cake in a greased oven dish for 35-40min

Recipe Notes

You can make this vegan by substituting the milk with almond milk or soy milk.

If you feel like indulging, add a few chocolate chips. 

Ingredients:

25-30 dates, divided use
1- 1 1/4 cup milk( you need a little more if you use whole wheat flour)
4-5 tbsp sugar( optional, I do not add any sugar  since the dates here are sweet)
1 cup whole wheat flour or APF
1/2 cup oil
1 tsp baking powder
1/4 tsp baking soda
1 tbsp walnuts(or more if you are crazy about walnuts like me)

IMG_3588

Method:
Soak the dates(save 2-3 to be chopped &added to the batter) in warm milk (3-4 hours is enough for the dates we get here) Remove the seeds if not using seedless.

IMG_3585

Blend them to a smooth paste along with the milk in which it is soaked in.

IMG_3590

Add oil and mix.


Sieve together flour and baking soda. Add the flour one table spoon at a time and mix slowly.

IMG_3591

Taste and if needed add sugar. Add the nuts, chopped dates and mix.


Preheat the oven at 350F. Bake the cake in a greased oven dish for 35-40min

IMG_3594

Notes:
You can make this vegan by substituting the milk with almond milk or soy milk.
If you feel like indulging, add a few chocolate chips.

Also, if you use  1/2 whole wheat & 1/2 unbleached flour, you can leave out the baking powder.

Variation:

Apricot-almond cake

Apricot cake

I love making a similar cake with Apricots & Almonds. It has a much more delicate flavor and goes well as a desert with a dollop of whipped cream

Aysegul from Turkey tried this recipe and was sweet enough to share her photo, here it is:

y45G9k.jpg

en_USEnglish