Categories
Curry Daal Gluten-free Healthy foods Indian Lentils Low carb Maharashtrian Protein salad Vegan Vegetarian

Pendpala- a dry masoor daal curry

Daal or lentils are an integral part of the Indian cuisine. Its used in many forms, with skin, without skin, powdered, roasted, raw and so much more. In parts of India where the water is scarce, not enough fresh vegetables, you will see a predominant part of region’s cuisine. If you visit Rajasthan, the western state of India, you will see so many dishes that made with Chick pea flour, like Gatte ki kadhi, Kachori etc.

Hearty Solapuri meal

Solapur, the town I come from is situated in the middle of state Maharashtra. There are no rivers or water bodies near Solapur and the summers are brutal. All of this means that the cuisine relies on shelf stable ingredients more than the fresh vegetables or fish. You will see use of Jowar and Bajra more than the wheat and rice. Jowar and Bajra and drought tolerant and need much less water than growing wheat or rice.

Millets like Jowar or Sorghum and Bajra or pearl Millet are excellent source of nutrients. They provide lots of essential nutrients not only to the human beings but it’s also gentle on the soil

Typically farmer, or those who do lot of physical labor, and come from neighboring villages for work, often pack a hearty lunch of Jowar Bhakri, peanut chutney and some dry subji. The subji is dry which prevents it from getting soiled in the hot weather of solapur. Often times it has lentils or chickpea flour

One such preparation is Pendpala. I don’t know how the name came about but I can guarantee you, it’s plain delicious. Full of protein, it’s is a a great compliment to the bhakri and completes the meal

I love that all of the ingredients needed to make this are shelf stable and easily available.

What makes it absolutely delicious is the Kala Tikhat, a special spice mix from Solapur. It’s a combination of many whole spices, along with onion and garlic. I will share that recipe soon. It’s made a few times a year and can be used in many recipes.

I learnt this from Anusaya. Anusaya is help at home but she is much more than that. She is family. She has been coming to our house for the last 45 years. I have rarely seen even family members as loyal as she is 🙂

Kala Tikhat

Some people call it Daal Kanda, which translates to Lentil Onion, and some also make it with toor daal. I make the Pendpala with Masoor daal and serve it with sorghum bhakri, peanut chutney, Green Tomato chutney and raw onion. A complete, balanced, wholesome, protein packed, gluten-free vegan meal 🙂

Masoor Pendpala Solapur style

Spicy, delicious lip smacking daal recipe, easy to make

Course Appetizer, Side Dish
Cuisine Indian, Maharashtrian, vegan, vegetarian
Keyword daal, lentils, vegan, vegetarian

Ingredients

  • 1 Cup Split masoor daal
  • 1 Onion Chopped
  • 2 Garlic cloves
  • 2 Tbsp Oil
  • 1 Tsp Turmeric Powder
  • 1 Tsp Salt
  • 4 Tbsp Roasted peanut powder
  • 1 Tbsp Chopped cilantro
  • 1 Tbsp Kala Tikhat
  • 1/2 Tsp Red chili powder optional

Instructions

Prep

  1. Soak the daal for 20-30 mins

  2. Drain the water

Cook

  1. Heat the oil in a wok. Add turmeric, and chopped onion and garlic.

  2. Cook the onions and garlic till soft, ensure that its not too burnt

  3. Add the drained daal, salt and stir to mix

  4. Cover and cook till the daal is soft on low-medium flame . We dont want it to be mushy. It should be cooked but hold its shape. It takes about 8-10 mins

  5. Add kala tikhat and red chili to taste

  6. Add peanut powder , cilantro and mix well

  7. Serve with Bhakri

Categories
dessert Drinks & Coolers Fat Free Fusion Gluten-free Indian Italian Vegan Vegetarian

Kokum Granita

Summer is almost here  and I have all these amazing memories of different summer vacations I have taken.

I remember waking up to beautiful mornings with the birds were chirping, and scent of various flowers filled the air. One of the birds was called Tambat, which translates to Coppersmith. It makes a sound of a hammer beating down a sheet of copper, I guess that’s where it got its name from. After waking up we would wash up, I still remember those big copper earns filled with water.

My Mami a typical woman from Konkan, unadulterated love, simple life and always a smile on her face that’s how I remember her. She would make beautifully scented rice porridge  which would be served on a giant leaf of a Moochkund tree, which is also called ‘dinner plate’ tree. It was simply dressed with a touch of ghee and salt.

Muchkund Leaves

There were bounties of summer like Karvande, Jambhul, but best part about that vacation used to be mangoes, mangoes for breakfast ,Mangoes for lunch, mangoes for snack Mangoes for a drink, what more can one ask for. I still remember very vividly the room full of mango is layered beautifully on a bed of hay. My aunt would tell us to go look for the ones that are ripe and then the party started.

We would wander around in the village, on the paths paved with Chire, a red stone from that region, leading up to the temple. There was a small pond near the temple called Ban Ganga, we would explore around and head home when the stomach started growling.

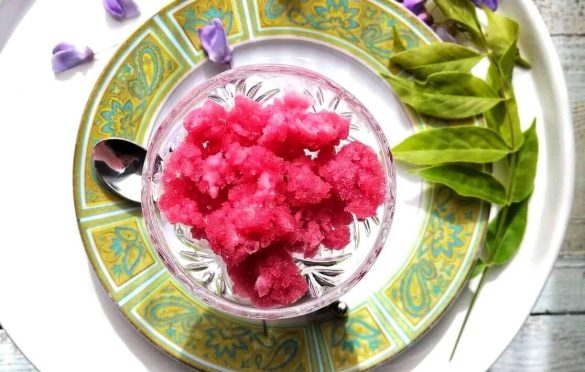
Mami would have a drink ready for us, made from the Kokum or ratamba as its called in that region. Gorgeous garnet, ruby color, delicious taste and thirst and heat quenching, this used to the the perfect treat after a walk in the village.

Kokum Sherbat

Fast forward to 2018 when I went to Sicily with my family. I fell in love with Italy and would love to live there some day. We enjoyed some amazing foods and a few of the favorites originated in Italy. Cannoli, Arancini to name a few. One of those dishes is Granita, a refreshing icy treat that comes in all kinds of flavors. It so reminded me of the Barf Gola we get in India.

Gelato

The best part was that the granita is enjoyed at breakfast with brioche, dessert for breakfast, what more can one ask for.

So today’s recipe is my summers relived, Kokum granita showcases two of my favorites, konkan and Sicily.

Kokum Granita

A refreshing summer dessert with tangy and sweet flavors

Servings 4

Ingredients

Ingredients

  • 3/4 cup Kokum Agal without sugar
  • 2 1/2 cups of water
  • 1 1/2 cup sugar
  • 1 tsp Cumin powder
  • 1/2 tsp salt

Instructions

Method

  1. Bring 1 cup of water and sugar to a boil. Keep stirring till sugar dissolves.
  2. Keep aside. Stir in the rest of the water. Taste and add more sugar if needed
  3. Add cumin powder and salt and stir.
  4. Put this mixture into a baking tray, keep it in fridge for 2-3 hours. The mixture will start freezing around the edges slowly. Take the tray out and scrape the frozen part with fork, and put it back in the freezer.
  5. Keep repeating till all of the mixture is frozen into fine ice.

Serve it in a bowl.

Recipe Notes

You can make this a couple of days ahead, just make sure to scrape it with a fork right before you serve

You can also serve it with cream or ice-cream 

You can serve it at breakfast with brioche 

Categories
Bihari Drinks & Coolers Fat Free fibre Gluten-free Low GI Protein Vegan Vegetarian Whole Grains

Sattu Ka Sharbat & Banaras

Growing up in Maharashtra, India I had not heard much about this ingredient. My mom used to ask us to eat ‘Saatu’ but it did not quite register as a special thing.

Fast forward many years and I remember my first visit to Varanasi, I fell in love with this place. I know people talk about the dirt and filth but all I could see was the peaceful ghats, a tremendous sense of devotion, and one becoming aware of one’s mortality and of course the food.

Every corner you turned there was some amazing delicacy to be devoured. We feasted on Jalebis, Kachoris, Lassis and so much more. I don’t know if its the water, air or the fact that many of these places have been there for generations, but each thing tasted amazing. I don’t remember having bad food in that town.

A lot of the food eaten was Satvik, which means there was no onion and garlic in the recipe, honestly I did not miss it.

I am a Chai addict and I must say some of the best chai I have had was in Varanasi, I think its the milk thats pure and fresh which makes all the difference. I loved roaming through the lanes and exploring because I feel ‘Banaras happens in the gallis’

I just loved how chilled out people were here, taking there own time to read a news paper, chat with a friend over a plate of kachori or even get a haircut, everything had a sense of calm. I went on a boat ride every morning that I was there, just the sound of water and the oars, some bells in the background and bliss.

Ghats have a lot going on, different ghats decorated in different styles. If you just observe, you get to learn a lot.


I will never get tired of this city, its fascinating on many levels. I feel that even meditating here was very powerful and peaceful.

On our way to the airport we stopped for a cup of chai, I mean everyone knows what kind of chai you get inside the airport 🙂 . On the same stall this man was making litti chokha, and man that was some delicious preparation. He was roasting them on open fire and the best part was that the litti was stuffed with some tasty mixture called Sattu.

That was my introduction to this magical ingredient called ‘Sattu’. This is powder of sorts made with roasted whole chana in most part, however there are some variations that add barley as well as Jowar/sorghum to it. Its commonly seen in the Northern India, mainly Bihar & UP as well as Pakistan and Nepal. Simple sounding however a true superfood, Sattu can be used in multiple applications. Often times savory and sweet drinks are made using Sattu, and in Bihar you would get to taste delicious sattu stuffed litti or even parantha. I must tell you that parantha turns out amazing. I will share the recipe some day soon.

Not only does it taste good and easy to make but its a power house of health benefits. Super high in protein, fibre, gluten-free, vegan and perfect for the summer and it cools down the body.

So when I came back from Varanasi and was talking about it my driver was very happy. He is from Varanasi and an ardent Sattu follower. When he heard that I liked it, he brought two homemade sattu flours for me along with a recipe for the sattu savory drink. I made it and loved it.

I make an effort to make traditional recipes and follow whats good for you in that season, if you like that idea then try out this recipe. Its super easy

Sattu ka namkeen sharbat

Cooling  

Naturally gluten- free & vegan 

Low GI

Ingredients

  • 2 cups cold water
  • 2 tablespoon gram sattu
  • 1 1/2 tsp lemon juice like to taste
  • 1/4 T Spoon Sendha Namak
  • 1/2 tsp spoonful of cumin seeds
  • 1 tsp finely chopped mint
  • 1 tsp finely chopped cilantro
  • 3 tbsp peeled and grated Green Mango optional
  • 1/4 Tsp finely chopped green chillies optional
  • 1/4 tsp salt

Instructions

  1. Mix the sattu with a little bit of water, enure there are no lumps left

  2. Mix the rest of the ingredients along with the remaining water & stir

  3. Serve chilled 

Recipe Notes

You can also make a sweet version, mix a little bit of honey or Gud with water and sattu powder

Categories
Appetizer Bengali British European Protein Snack Vietnamese

East-er Eggs – Indian scotch eggs

You know how some ideas just keep brewing in your head but it takes forever for it to happen, but when it happens its even better than what you had imagined. Today’s recipe is one of those recipes.

It has two may be three recipes. They are different and yet complimentary and there is one thing that ties them together. I get excited and happy when that common thread works just so wonderfully.

Part One – London & Kolkata

I visited Kolkata with the family and absolutely loved the Bengali cuisine, especially the snacks and the sweets. The sweets made with fresh chenna that melt in your mouth are to die for. We were there when the most prized ‘Nolen Gur’ was in season and the sweet shops were showcasing various things made using this liquid gold, I fell in love with this Gud. The softest Rosogulla and sandesh made using this Gud were my favorite.

There are many snacks that are popular in Bengal. Different types of kachoris, Jhal Moori which is a snack made with puffed rice and the famous ‘chaap’ to name a few. The word ‘chaap’ possibly comes the english word Chop, but this one has no meat in it and instead is made from different vegetables, especially beets which gives it the classic red color. Its served with chutney like most Indian snacks.

I started making these chaap ever since then and everyone loves them.

I love traveling, within the country, internationally, alone, with a group, I just love to travel and more often than not, food is a critical component of my itinerary. So even when I was on a business trip to London, I made sure I visited the grocery store and local market and tried some of the specialities. One of the things I ate for the first time was Scotch Eggs. An egg wrapped up in minced meat and fried, then cut open and served with some mustard, its a popular pub food. I love eggs in any form so I had obviously liked these.

Today I decided to borrow on these two ideas for a a recipe I had in mind.

Beet Scotch Eggs

I took the beet mixture from the Bengali chaap, wrapped it around very soft boiled egg and deep fried it.. result.. delicious !!!!

Bangla Scotch Eggs with Kasundi

This recipe is inspired from two dishes I tasted and loved. 

Ingredients

  • 4 Beets Boiled and grated
  • 1 Potato Boiled and mashed
  • 1 Onion Finely chopped
  • 1/2 Tsp Garlic Paste
  • 1/2 Tsp Ginger Paste
  • 1/2 Tsp Garam Masala
  • 3/4 Tsp Roasted Jeera Powder
  • 1/2 Tsp Red Chili powder
  • 1 Green chili Finely chopped
  • 1 Tbsp Oil
  • Salt to taste
  • 4 Eggs

For coating

  • 1/3 Cup Maida/ All purpose flour
  • 1/3 Cup Water
  • 3/4 Cup Bread Crumbs

For Frying

  • Oil

Instructions

  1. Heat oil in a pan, add chopped onions and saute till soft

  2. Don’t let them caramelize 

  3. Add ginger and garlic paste and saute for a few secs

  4. Add the grated beet and saute till its almost dry 

  5. Now add cooked potato thats very well mashed

  6. Mix and saute well till the mixture is dry 

  7. Add salt, a pinch of sugar, garam masala, cumin powder and red chili powder

  8. Mix well 

  9. Add green chilies and turn the heat off 

  10. Set the mixture aside to cool 

Cooking the eggs

  1. Boil water in a sauce pan

  2. Once the water comes to a boil, slowly add all the eggs in the pot

  3. Cook for 4-5 mins with a rolling boil

  4. Drain the eggs  and run  under  cold water 

  5. Peel the eggs and set aside 

Batter for Frying

  1. Make slurry with the all purpose flour and water. The slury should be thin but thick enough the coat the egg. 

  2. Take the breadcrumbs in a bowl and season with some salt

Heat some oil in a deep pan on medium heat

Frying the eggs

  1. Take one eggs and fourth of the beet mixture. 

  2. Cover the egg completely with the beet mixture, making sure the coating is even and no gaps. Press the coating tightly, this ensures that the coating will not fall off while frying 

  3. Dip this beet covered egg in the slurry, ensure it oats the whole surface

  4. Roll it in the breadcrumbs 

  5. Fry the egg in the oil on medium heat till its crisp all around

  6. Let it cool and then cut it in half carefully. Since the egg is half boiled, the yolk would be soft and spreadable

  7. Serve with pickled onions and Kashundi 

Part two- California, Bengal

I love eggs and I love to eat them in any form, wait did I already say that? Anyway so I love making sandwiches as the weather gets warmer and one of my favorite is Banh Mi, a Vietnamese sandwich. Crusty white roll with even crunchier pickled vegetables, its a treat. I feel that pickles of all kind can perk up even a boring meal. Although now pickles are made in every part of the world, it is said that the process of pickling might have started in 2400 B.C in Mohenjo Daro. No matter who started making it, it sure is a favorite of many unless you are in a pickle ( get it 🙂 , sometimes I surprise myself with my play on words, hehe !)

So I wanted to pickle my eggs to make egg sandwich and then I got inspiration from the ‘Pennsylvania Dutch’ who add beets to their pickling process and I did just that. But I wanted to make it a little different and drew on my Indian spice box and one of favorite spice mix, Panch Phoran. Panch Phoran translates to Five Spices, it comes from Bengal, east India. Typically it has fenugreek, Cumin, Mustard seeds, Nigella seeds and Fennel. I love it because even though its simple, it delivers amazing flavor to any dish you add, daal, meat, fish or even pickle 🙂

These pickled eggs provide the much needed acidity to the fried Beet Scotch eggs.

Panch Phoran pickled eggs

Ingredients

  • 3 Tbsp Panch Phoran recipe on the blog
  • 1 1/2 Cup Red Wine Vingar
  • 4 Tbsp Thinly sliced shallot or red onions
  • 2 Beets Sliced or qurtered
  • 2 Tbsp Sugar
  • 1 Tbsp Salt
  • 4 Eggs Soft Boiled
  • 1 sprig Mint to serve
  • 1 Tbsp Kasundi to serve

Instructions

  1. Mix salt & sugar in the red wine vinegar and stir till dissolved 

  2. Gently pound the panch phoran and add to the vinegar

  3. Take a glass jar and add the eggs, sliced shallot and beets to it

  4. Pour over the vinegar mixture

  5. Close the lid and let it sit in the fridge for 2-3 days 

  6. When ready to serve, cut the eggs in half carefully

  7. Chop the pickled onions and beets finely

  8. Top the egg with the chopped onions and beets 

  9. Garnish with mint and kasundi 

Recipe Notes


Panch Phoran : Here is a simple recipe for your reference 

Don’t keep the eggs for longer than 3 days, you will not have a beautiful demarkation of red/pink and white

To soft boil the eggs, add eggs to boiling water and cook for 5 mins. Drain and run under cold water and peel 

You can also make deviled eggs with this. 


Categories
Breakfast Indian Maharashtrian Snack Vegetarian

Dahi Sabudana- tapioca pearls with spiced yogurt

Spring/summer  is here. The rain gods have been kind and hence all the mountains around where I live are still green.  Near my home there is a barn and they bring out their sheep for grazing at this time, with the rolling hills, and the sheep,  it feels like Swiss countryside.
In India, we celebrate Holi. During holi a effigy of a demoness is burnt in fire. This demoness symbolizes all the mean thoughts, all the resentments that one might be carrying, you burn it all in the fire of Holi.  This is the time when we celebrate New Year according to the lunar calendar. Interestingly around the same time Parsi’s and Iranis’s also celebrate Navrouz, which translates to ‘New Day’. In short its all about starting afresh, leaving all the baggages that you might be carrying and focus on the future.

In India we have Navratri ( which translates to ‘9 nights’) twice a year. Interestingly they both fall when the season changes from hot to cold and cold to hot. One is in spring time and one in fall. During this time you fast, you don’t eat meat, regular vegetables, no cereals. I think it is very much needed, it gets your body time to adjust and also get ready for the new season. Its like a cleanse, where you eat light foods, people also try not to eat garlic & onion.


Each region in India has its own rules of what to eat and what not to eat during these nine months, some eat spinach, some eat tomatoes, others don’t. A few things like tapioca, water chestnut, sweet potatoes, cucumber are eaten across the country.

I come from Maharashtra where Sabudana Khichadi is very popular. I recently did an Insta story on it. Whenever I ask my kids what they want special for breakfast, the answer is Sabudana Khichadi . My husband can eat bowls of it. I normally end up making enough so I have leftovers as he likes to eat it the next day again.

Everyone knows Sabudana Khicadi but might not know this recipe. My mom makes it so well, my sister can eat bowls of it for days and not get tired. I like it more than Khichadi because it feels kind of cooling and I love yogurt 🙂

Dahi Sabudana

Ingredients:

  • 2 cups tapioca pearls ( you can get them in any indian grocery store)
  • 3-4 green chilies ( I use the thai chilies that are super spicy)
  • 1 1/2 tsp Cumin seeds
  • 1/3 cup roasted peanut powder
  • 1 cup buttermilk (if you can not get buttermilk, you can churn 1/2 yogurt with 3/4 cup water)
  • 1 cup
  • salt to taste
  • 1 tbsp sugar
  • 2 tbsp chopped cilantro

Method

  • Dry roast sabudana/tapioca
  • After it is cooled down, soak in some water for about 30 mins
  • Pound the cumin seeds and chilies to make a coarse paste. I prefer using mortar pestle but you can also use a chopper
  • After 30 mins, drain all the water and soak in buttermilk for at least 4-5 hours.
  • Now add yogurt ( preferably whole milk), roasted peanut powder, chili-cumin mixture and salt n sugar to taste.
  • Garnish with cilantro

Note:

  • You can also cook the sabudana in water until it is translucent ( instead of roasting and soaking in buttermilk).
  • Mix it with yogurt, roasted peanut powder, salt, sugar and the chili cumin mixture. You can also  add tadka of ghee jeera mirchi if desired
  • Garnish with cilantro
Categories
BBQ Healthy foods Middle eastern salad Side dish Tunisia whole grain

Grilled Harissa shrimps

I love spicy food. When I go the farmers market, I am always looking for the spiciest chili. So in summer when we get the fresh red thai chili in the market, I make at least a couple of batches of Harissa. It can perk up any dish pretty quickly.

I like to make these shrimps using Harissa, the dish comes together very quickly and can be served as a main dish or a salad.

Shrimps don’t need a lot of marination so this dish can be made in 20 minutes.


Although Harissa is Tunisian I feel that the Mediterranean flavors compliment it well. So I decide to bring those along.I also brought in some more Mediterranean flavors with a quick salad. I took some yellow and Red cherry tomatoes, chopped Persian cucumbers and mix them with fresh chopped mint and topped with feta cheese.

Here is the recipe.

Ingredients

  • 20 large shrimps
  • 1 large clove of garlic crushed
  • 1 tbsp pomegranate molasses
  • 1 tbsp Harissa
  • 1 tbsp oil

Method

Mix all the ingredients except to form a paste. Now add shrimps and mix well. Make sure all the shrimps are coated evenly with the paste.

Let them marinate for 20 mins or so.

Pomegranate molasses not only provides the sweetness to balance the heat from Harissa but also add a tangy flavor & color to the shrimps.


Grill on a grill plate or bbq. Brush the shrimps with some oil of needed to prevent them from sticking to the grill.

I like to thread some tomatoes or large zucchini pieces along with the shrimps, I feel it adds a Pop of color and texture.


You can serve the shrimps as a side with brown rice and some grilled fruit. Today I grilled some nectarines, the sweetness of the grilled fruit complimented the spice of harissa.

You can mix them with a lot of chopped herbs like basil and cilantro and serve as an appetizer.  I love making this version in summer when the herbs are in abundance in the market.

IMG_3512-1


I use Harissa in many dishes, like Pumpkin Shrimp curry, or Cheddar Muffins. Enjoy!

Categories
Fish Healthy foods Main Dish Not sure

Grilled trout with herbs

I love summers especially since we can enjoy barbeque outside. There is something special about this time of the year when you get abundant  vegetables and fresh herbs in the farmers market, all the produce is at its peak and taste great.

trout5

I love summers also because we can grill out side. You can just have meats and veggies ready and when everyone gathers, just throw them on the grill and you got yourself a meal. There are two camps when it comes to grill, the coal one and the non-coal one, we for sure belong to the first one. In my opinion nothing beats the taste of fresh corn on the cob just grilled to perfection on the coals. The chicken tikka with the smoky flavor of the coal tastes amazing. So as you can see we love grilling with coals.

So today we had a few friends over for BBQ. I had marinated a lot of veggies, made some stuffed pepper , there was fresh corn on the cob, some couscous, masala chicken and my son decided to make some fish.

Veggies ready for the grill

When it comes to fish I am very picky, not because I want to be  but because of the fact that I can only eat fresh water fish. I am ok with catfish, bass etc but can not eat salmon.

So when my son decided to make trout and that too whole fish, I was a little skeptical but decided to go along. He went and bought the trout from Whole Foods, and made it with very simple ingredients..but man it tasted so yummy. It was delicate yet flavorful.

Ingredients

4 whole fresh water trouts

few sprigs of dill

few leaves of sage

few sprigs of parsley

few taregon leaves

2 lemons sliced

salt & pepper

Olive oil

Trout 7

Method

With a sharp boning knife slice the fish horizontally.

Apply some olive oil both inside & outside.

Sprinkle with salt & pepper.

Layer the inside with some herbs and lemon slices.

Trout 2

Let it sit for 10-15 mins covered.

Trout 1

Brush the grill with olive oil. And place the fish gently on the grill.Cook for 3-4 mins on the first side and then a couple of minutes on the other side.

To serve

Take the main bone out, take the fins, head and tail off. Make into fillet and serve. My son did an amazing job of taking the main bone out and filleting the cooked fish.


Categories
Appetizer Chicken Healthy foods Kids favorite Not sure

Chicken porcupine  kabob

  You hear all the time that kids are fussy eaters and you got to try all kinds of tricks to get them to eat good stuff. I must say I got lucky, both my kids never troubled me with eating, they eat anything & everything I make for them( may be barring ‘indian bitter melon). 

I also see and hear that the kids want to eat junk and throw tantrums if they don’t get any. I have seen kids eat chicken nuggets everyday. Again, I can not complain here, my kids don’t eat junk at all, in fact if you open my pantry, you will not find any chips, cookies with vegetable shortening. Instead of eating something that is processed and full of preservative, excess salt and sugar, my family eats dry fruits, dehydrated fruits & veggies, nuts…I am very thankful for that. 


As you can see, my pantry is loaded with nuts, dry fruits, healthy indian style popped lotus seeds etc. I have a designated place for everything so they find it easily. Most of  my containers are clear and labeled.   


So back to the making food for kids. I feel that if you make it fun, the kids enjoy and might try different things. 

Today’s recipe is one such fun recipe. It is tasty, healthy and easy to make. 

Chicken porcupine kabob 


It is a very simple recipe and if you have all the ingredients, you can make it in under 30 mins. 

Ingredients

3/4 lb ground chicken ( I use a combination of breast & thighs)

1/2 onion chopped really fine

1-2 cloves of garlic crushed

1/2 inch Ginger, chopped or grated

1 green chill finely chopped 

1/2 tsp garam masala

1/2 tsp cumin powder

3/4 tsp coriander powder

1 tbsp chopped cilantro

1 tbsp chopped mint

1 tsp chaat masala

Others

1/2 cup  basmati rice plus 1tsp salt, soaked for 1 hour

1 tbsp oil

Method

Drain the soaked rice. Take it on a plate. 

Start boiling the water to steam out Kabob. 

Mix all the ingredient for kabob very well. 

Take the oil in a bowl. 

Make small balls from the chicken mixture. Dip it briefly in the oil, and roll in the rice grains. 

Arrange them on the steamer dish. 


Steam for 5-7 mins depending on the size of the chicken ball. 

Take out one and check if the chicken is cooked through. 

 Edit   

As  you can see the rice is steamed and pluffs up nicely. 

You can serve these with spicy mint chutney or a sweet and sour tamarind chutney or tomato ketch up.  

Edit   

Categories
dessert French Uncategorized

Tricky little temperamental Treat

French Macarons

IMG_2157

I had never seen a Stand Mixer until a few years ago. Always wanted to buy one since I saw it but could not justify the investment …until today, I bought my first KitchenAid..

Growing up in India I did not know much about baking. For one, we did not have any oven or any stand mixer  at home.  Mom made cakes on the stove top in this contraption and creamed the butter & sugar patiently with just her hands. I always love the cakes she makes but now I appreciate even more knowing how much effort went into it. When I came to the US I tasted so many yummy baked good and I started baking as well. The first time I tasted Macaroons, I did not care much more it. I personally don’t like coconut & chocolate together. Every time my daughter asked me to make Macroons, I kind of made excuses since I thought she was referring to Coconut Macaroon.


Then last year, Whole Foods opened near where we live and I got to see and taste French Macron for the first time, and let me tell you I fell in love with it.  Every time we go grocery shopping to Whole Foods, we coem back with a pack of macrons. They are yummy but expensive and I never felt like I ate to my hearts content.


So I decide to try and make Macrons at home. Usually I am good at following instructions and recipes, so I figured I can make macarons as long as I have the recipe and ingredients. Boy was I wrong, I failed miserably…not one, two, more like 6 times.  I had almost given up…but then I remembered that I had a set a birthday goal for my self. Yeah, like people set New Years resolutions, I make Birthday resolutions. On every birthday I set a few goals and try to complete them before the next birthday. So going back to Macrons, making them is one such goal I made last year and just could not give up.

I tried the seventh time… and very proud to say it worked. And that is how that KitchenAid came into my life..

French Macarons- a delicate temperamental cookie..but worth every min spent on it.

Macrons have very simple ingredients and looks very deceivingly easy looking, but the trick is in following all the steps and tips. I watched many you tube videos, read many recipes and then finally settled on this one..


Ingredients:

Cookie:

7 oz Confectioner ( powder) sugar
4 oz  Almond flour/meal
4 oz  Egg whites at room temp
3.5 oz granulated sugar
1/8 tsp cream of tartar
1/4 tsp gel color of your choice

Filing

1 cup unsalted butter at room temperature
4 cups Confectioner ( powder) sugar
2 tbsp lemon juice
2 tsp lemon zest
1 tbsp milk

Method

A. For cookies:

Part 1- Dry mixture
  1. Sift the almond flour and the confectioner sugar at least 4-5 times. This makes the batter light and also ensures that there are no lumps in the batter.
Part 2- Meringue
  1. Making meringue- Take the egg whites and start beating them on a low-medium speed until it foams
  2. Add granulated sugar slowly. Once all the sugar is added, add the cream of tartar.
  3. Kepp checking in between and make sure you stir in between so make ensure that there is no liquid egg white remaining at the bottom of the bowl.

IMG_2150

  1. Scrape down the sides, add the food color
  2. Beat on high till you get a soft peak.
  3. It is not done if you get a beak, when you left the whisk out of the egg mixture.
Part 3- Mix the ingredients
  1. Mix 1/3 of the almond flour mixture in the egg mixture.
  2. Using the folding action mix the dry ingredients with the wet ingredients.
  3. When the dry flour is sort of mixed, add the next 1/3 and continue
  4. THIS IS IMPORTANT- DO NOT UNDER MIX OR OVER MIX. THIS PICTURE SHOWS YOU EXAMPLES.
  5. When you can see a ribbon falling from your spoon, your batter is ready
Part 4- Piping and baking the cookies
  1. Draw circle on the paper. These will act as a template for piping your cookies.
  2. Out that template on the baking sheet.
  3. Line your baking tray with parchment paper, on top of the template
  4. Fill the mixture in a pastry bag and using a #2 round tip, pipe the cookies on the parchment paper

IMG_2151

  1. Make sure you keep the tip almost buried in the mixture so you don’t get a point on the cookie- if you get a point it will look funny and the point will burn during baking
Part 5- Drying of the cookies
  1. Heat the oven to 325 F.
  2. Take the tray with the piped cookies and tap really firmly on the counter. This will ensure that the air trapped is released

IMG_2149

  1. Let the tray sit on the counter until the cookies have a skin on top and are dry to touch. Depending on the weather it could take from 20-30 mins
  2. I write the time on it so I know when I can check.
  3. Now your cookies are ready to go in.
Part 6: Baking
  1. Make sure that the oven temperature is right.
  2. Bake th cookies  for 10-15 min
  3. Turn half way to ensure even baking
  4. Check if the cookies are done- when you gently try to move the top and it kind of wiggles and slides, the cookies are not done.

IMG_2154

  1. Watch carefully  though since they go from not done to done very quickly
Part 7: Cooling
  1. I know it is tempting to eat them right away
  2. Wait for 3-4 minutes to take the cookies off the baking tray
  3. Let them cool completely before you fill them up.
B. For Filling
  1. Beat the butter until creamy
  2. Add the powdered sugar a little at a time.
  3. Add the color, lemon juice and zest and beat the mixture until light and fluffy.
There are 7 key points to remember, I have listed them here and have mentioned again along the way.
  1. Measure your ingredient- I recommend weighing them instead of measuring in a cup
  2. Sieve the almond meal & Suagr
  3. Beat your egg white just till soft peak stage
  4. Don’t over or under mix the Egg & Almond mixture
  5. Make sure the air is tapped out before you bake the macrons
  6. Make sure they dry out before you bake
  7. Make sure the oven temp is right

IMG_2161

Categories
Breakfast Indian Maharashtrian

Sabudana Khichadi- a typical Indian Breakfast

Jump to Recipe

Sabudana ( Tapioca) looks  like tiny white pearls, made from roots of the cassava plant, it is very common in Indian cooking. It is a younger cousin of the Boba tea/Tapioca tea. Typically it is eaten during fasting, but also eaten as a common breakfast food. It is can be made as a savory or a sweet dish. It can be eaten like a tapioca pudding but my favorite recipe is a savory one.

My husband and kids are big fans of this and happily eat it any time. In fact whenever my son comes home, the first thing he wants to eat is this ‘Sabudana Khichadi’


Jump to Recipe

Sabudana Khichadi

A popular dish from Maharashtra India, made with Tapioca Pearls, seasoned with green chili cumin and peanuts, its often enjoyed during 'Vrat' or Fasting

Course Breakfast, Snack
Cuisine Indian, Maharashtrian
Keyword fasting, vrat

Ingredients

  • 3 cups Soaked sabudana sago/Tapioca
  • Sugar
  • Salt
  • 1/4 cup milk at room temp
  • 1/2 cup roasted peanut Powder

Spice paste

  • 1 1/2 tbsp Cumin seeds divided use
  • 4-5 green chilies

Tadka

  • 3 tbsp ghee
  • 1 1/2 Tsp Cumin Seeds
  • 1-2 Green Chilies Adjust based on spice preference
  • 1-2 Potatoes peeled and sliced

Garnish

  • Chopped cilantro
  • Fresh grated coconut

Instructions

  1. Take the sabudana in a large pot. Wash it with cold water. When you start washing it will looks cloudy
  2. Wash until the water runs clear. This helps get rid of excess starch which makes the khichadi clumpy when cooked.
  3. Add water just to cover the sabudana and a little over.
  4. Now let it soak for at least 7-8 hours. I end up soaking it overnight since I make this mostly for breakfast.
  5. About an hour before you plan to make the khichadi, take the milk and sprinkle it over the soaked sabudana. Using fork separate the grains and leave aside.
  6. Make powder with roasted peanuts
  7. Make paste with the green chilies & 1 tbsp of cumins seeds in a mortal & pestle, you can also use a blender.
  8. Add peanut powder, chili mixture, salt & Sugar to the soaked sabudana and mix well.
  9. In a pan heat oil, add cumin seeds. Add some green chili pieces and saute till the cumin seeds are brown.
  10. Add sliced potatoes, add salt to the potatoes and cover.
  11. Cook until the potatoes are done.
  12. Add the sabudana mixture and cook. Cover for only a couple of mins and stir constantly, this will prevent clumps from forming. The easiest way to know when it is done is to check if the pearls are translucent.
  13. Add the ghee and mix well. Traditionally it is cooked in ghee, but if you are trying to avoid it then adding just a couple of tbsp at the end is a good solution. This gives the flavor of ghee but you dont have to cook solely with it.
  14. Garnish with chopped cilantro, fresh grated coconut and yogurt or a lime wedge.
en_USEnglish