Categories
Cakes

Banana Walnut Cake

It has been ages since I last posted a recipe. This summer we were on our India vacation, had a great time eating all kinds of favorite foods and of course spending time with the family.

Every time I visit India I am reminded of a few things and one of the most important one is there is a large population in India which does not even get enough food to eat everyday and that I should be very thankful to have food on the table every night for me and the family. So when I see food getting wasted it bothers me a lot. At work they bring in fresh fruit everyday, it is great to have such a healthy option for snacking and I appreciate it, however I was very shocked to see that some Bananas were getting thrown out just because those had a few brown spots. When I saw that I asked if I could bring those home and our office manager was surprised but said,” Sure!”

So I brought it home and the next day my team members got to eat homemade, whole some banana bread. I was happy that I saved three bananas from going into the trash and my coworkers were happy to eat a piece of home made banana bread. Sorry I did not get time to take step-step pictures since it was a work day, please let  me know if you have any questions.

IMG_2853 1


Banana walnut cake

IMG_2852


Ingredients:

IMG_2845
1 stick of unsalted butter at room temp
1 cups of sugar
3 eggs at room temp
3 over ripe mushy bananas, puréed
1 3/4 cups of wheat flour
1 tsp baking soda
1/2 tsp vanilla
Pinch of salt

Procedure:
Preheat the oven at 350 F
Butter a bread loaf pan.

Sift the flour, salt and baking soda.

Cream butter & sugar until nice and creamy
Add eggs, one at a time until mixed well
Add banana purée and vanilla and mix.
Add the flour mixture a few spoons at a time till all flour is incorporated.

Pour in the bread pan. Top with chopped walnuts.
Bake in the 350F oven for 50-55 mins.

IMG_2847


Recipe: Micky Singh

NOTE:
I have been asked if there is an option to replace eggs
One of the other sites talked about this replacement-
To replace three eggs
Grind 1 tbsp of flaxseed with 2tbsp of water till creamy( per egg).
1/4 tsp baking powder

Categories
Cakes dessert

Date Cake..butterless, eggless, sugar less

They say there is no such a thing as a free lunch, and there is no such thing as a healthy dessert. If it tastes good, it can not be good for you.

So when I found out that this yummy cake that my mom has been making  is  so healthy, I was very surprised. By the way I don’t know if you know but my mom is an incredible cook. She has been making some amazing recipes, new cuisines, new ingredients and even bakes some yummy things. I remember, our friends would come from school with us and they would be super surprised to know that the cake or cookie they are eating is actually home made, Aai is that good.

Back to the cake, since it eggless, sugar-free and butter free, everyone, even those with dietary restrictions can enjoy the cake. With this cake you can have your cake and not feel guilty. It is a favorite of all the friends and anytime I have made it, it disappears in minutes

This makes an ideal after school snack, lunch box treat or guilt free dessert.

Date Cake

IMG_3598

This cake is butter-less, egg-less, sugar less, made from whole grain and the best part is it tastes yummy.

Date Cake

A delicious cake thats egg-less, sugar-free and can be made vegan. A wholesome snack thats perfect for teatime, school lunches and so much more. Packed with goodness of dates, this cake will please everyone. 

Course cake, Dessert
Cuisine Indian
Keyword cake, dates, egg-less, No Butter, sugar-free
Servings 8
Author Anagha

Ingredients

Ingredients:

  • 25-30 Dates Divided use
  • 1- 1 1/4 cup Milk you need a little more if you use whole wheat flour
  • 4-5 tbsp Sugar optional, I do not add any sugar  since the dates here are sweet
  • 1 cup Whole wheat flour or APF
  • 1/2 cup Oil I use Safflower oil
  • 1 tsp Baking powder
  • 1/4 tsp Baking soda
  • 1 tbsp Walnuts or more if you are crazy about walnuts like me

Instructions

Method

  1. Soak 20-25 dates in warm milk till they are soft . About 3-4 hours is enough for the dates we get here, however you can leave it in the fridge overnight.  Remove the seeds if not using seedless.

  2. Blend them to a smooth paste along with the milk in which it is soaked in.
  3. Add oil and mix.
  4. Sieve together flour and baking soda, baking powder. 

  5. Add the flour one table spoon at a time  to the date mixture and stir.

  6. Chop the remaining dates

  7. Taste and if needed add sugar. Add the nuts, chopped dates and mix.
  8. Preheat the oven at 350F. Bake the cake in a greased oven dish for 35-40min

Recipe Notes

You can make this vegan by substituting the milk with almond milk or soy milk.

If you feel like indulging, add a few chocolate chips. 

Ingredients:

25-30 dates, divided use
1- 1 1/4 cup milk( you need a little more if you use whole wheat flour)
4-5 tbsp sugar( optional, I do not add any sugar  since the dates here are sweet)
1 cup whole wheat flour or APF
1/2 cup oil
1 tsp baking powder
1/4 tsp baking soda
1 tbsp walnuts(or more if you are crazy about walnuts like me)

IMG_3588

Method:
Soak the dates(save 2-3 to be chopped &added to the batter) in warm milk (3-4 hours is enough for the dates we get here) Remove the seeds if not using seedless.

IMG_3585

Blend them to a smooth paste along with the milk in which it is soaked in.

IMG_3590

Add oil and mix.


Sieve together flour and baking soda. Add the flour one table spoon at a time and mix slowly.

IMG_3591

Taste and if needed add sugar. Add the nuts, chopped dates and mix.


Preheat the oven at 350F. Bake the cake in a greased oven dish for 35-40min

IMG_3594

Notes:
You can make this vegan by substituting the milk with almond milk or soy milk.
If you feel like indulging, add a few chocolate chips.

Also, if you use  1/2 whole wheat & 1/2 unbleached flour, you can leave out the baking powder.

Variation:

Apricot-almond cake

Apricot cake

I love making a similar cake with Apricots & Almonds. It has a much more delicate flavor and goes well as a desert with a dollop of whipped cream

Aysegul from Turkey tried this recipe and was sweet enough to share her photo, here it is:

y45G9k.jpg

Categories
Andhra Rice

Tamarind Rice ( Puliyodharai)

I love authentic, traditional recipes. Agreed that sometimes they can be very involved and time consuming but I feel the taste after all that effort is unbelievable. Some of the old methods of cooking or prep work may look tedious, but those also have a great way of bringing people together. Imagine making raviolis together, or making papad in summer, or making pickles together, when you are working together teh work does not seem boring.  So i love collecting recipes that are authentic, passed down from generation to generation, this is my way  of preserving my culture and heritage, hoping to pass it to the future generation.

Today’s recipe is something I learnt from my friend Usha, who had leant it from her Ammamma( grandma).

Tamarind rice is very popular in Andhra Pradesh as well as Tamilnadu. This version I feel has both Andhra and Tamil influence on it. It is a typical brahmin recipe, and is used as Naivadyam on many auspicious ceremonies. I had eaten this the very first time in the famous Tirupati temple, so anytime I make it invokes the same feelings.

Although the recipe may look complicated it is not, it is complex. I will try to simplify the instructions as much as possible.

Tamarind Rice

IMG_3552


There are four steps to the recipe.

Step 1:

Make a tamarind chutney – This chutney is pretty much jam like consistency.

Part A ( tempering 1)

2 tbsp oil

2 tsp mustard seeds

6 red chilies

Few curry leaves

Part B   (Wet ingredients)

1 handful dry tamarind, cleaned and soaked in  2 cups of hot water

1/2 tsp turmeric powder

2 tbsp jaggery ( gud), you can substitute dark brown sugar as well.

Extract the tamarind pulp and discard any seeds or hard shells. Mix jaggery and turmeric in it.

Part A & Part C Wet ingredients & Tempering 1 (Part A & B)

Part C ( Dry powder)

1/2 cup coriander seeds

6 dry red chilies ( or more if you like it spicy)

1 tsp black pepper

1 tsp cumin(jeera) seeds

1 tsp fenugreek( methi) seeds

1/2 tsp mustard seeds

1 tbsp chana daal

1 tbsp urid daal ( skinless)

Few curry leaves

1/2 tsp asafoetida( hing)

Dry Masala Powder Dry Masala Powder ( Part C)


Dry roast the these and grind it in a coffee grinder( or a blender) to make a fine powder. Make sure you add fenugreek seeds and hing towards the end else it will burn and give bitter taste

To make chutney:

Tamarind chutney

Heat the oil for tempering, add the red chilies until they are nicely browned. Add the remaining things and saute till the mustard seeds splutter( Part A). Now add the tamarind-jaggery mixture( Part B). Cook this on a low flame until you get a nice jam like consistency.  Add the dry masala powder ( Part C) and mix well.  Keep it aside.

Step 2:  

1 .5 cups of rice

1 tsp oil

1/2 tsp turmeric

Cook rice with salt and set aside to cool. Once cooled add a  tsp oil and turmeric and mix well.

Step 3: Make  tempering 2

IMG_3565

Ingredients:

1 tbsp oil

1 handful ( or two) peanuts

1 tsp mustard seeds

1 tbsp urid daal

1 tbsp chana daal

1/2 tsp asafoetida

A few curry leaves

Roast/fry the peanut in oil on a low-medium heat. Add mustard seeds, urid and chana daal and saute well. Now add curry leaves.


Step 4: Mix it together

Mix the cooked rice with a few tbsp of the prepared Tamarind chutney. Typically 4-5 tbsp chutney is enough for 1 cup raw rice cooked.

Add Tempering 2. Mix well.

Garnish with chopped cilantro if desired.

You are done. Enjoy the authentic Pulliodarai


Notes:

This tamarind chutney lasts a while even outside and if you refrigerate it, it can last upto a couple of months.


Categories
Indian Snack

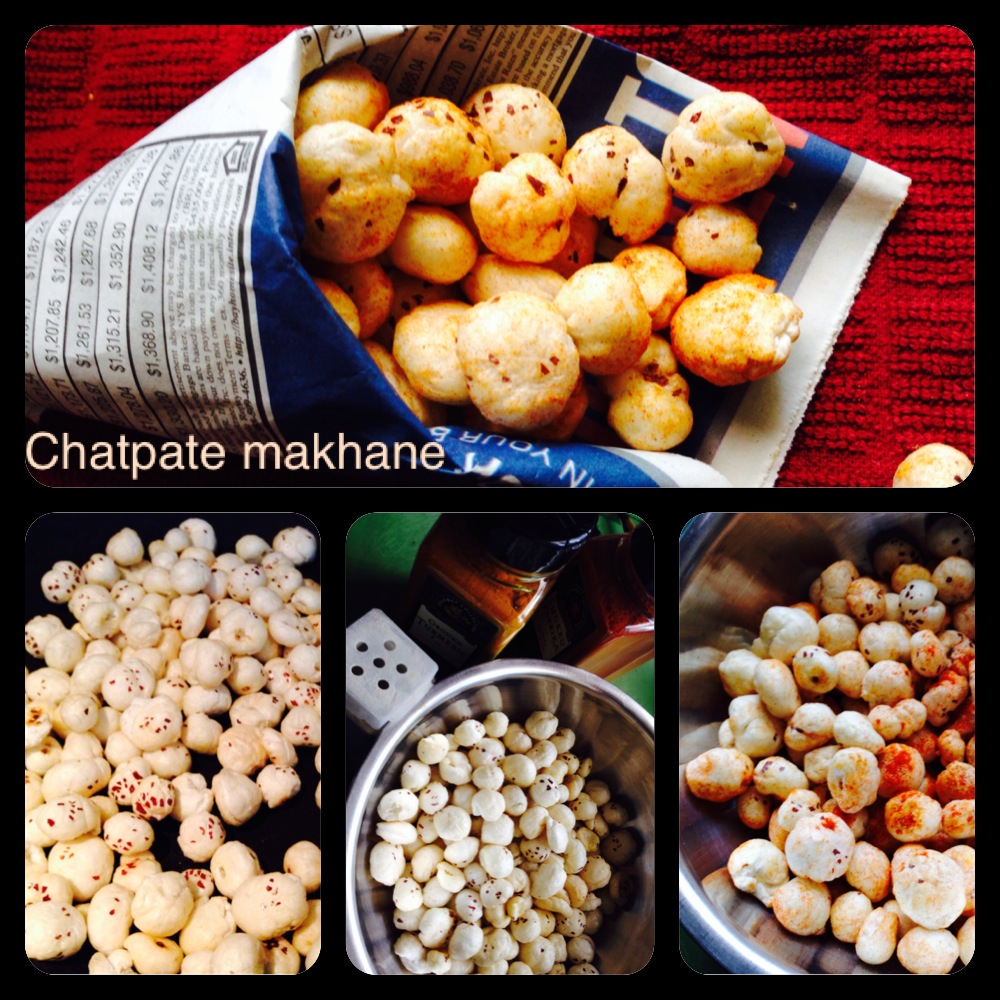
Spiced puffed lotus seeds…chatpate mahane

Making healthy and nutritional snacks without compromising the taste is always challenging to me. This recipe fits the bill very well.
Makhane are popped ‘lotus seeds’, considered to have many medicinal properries as per the ancient Chinese medicine science. It is loaded with potassium, calcium and iron, it is a great alternative for popcorn.
The aroma of the tiny yet divine ghee or coconut oil in this recipe is very tempting and smoked paprika for sure adds a nice flavor.

Spiced lotus seeds

IMG_2810

It is a very simple recipe, slowly dry roasting is the key to get a lot of crunch without a lot of fat

Recipe-
2 cups makhane( popped lotus seeds)
1/2 tsp ghee( clarified butter) or coconut oil

Spices-
1/2 tsp Smoked paprika
1/4 tsp Turmeric (leave it out if making for Vrat)
3/4 tsp Chaat masala( it is a mixture of rock salt, cumin powder, pink salt & some black pepper..all ground to a fine powder)
1/4 tsp Black pepper powder
1/4 tsp Amchoor( dried mango powder)

Dry roast the makhane on low flame till they start getting crisp. Add the ghee( or coconut oil) and coat the makhane well. Add all the spices and toss well.
IMG_2811
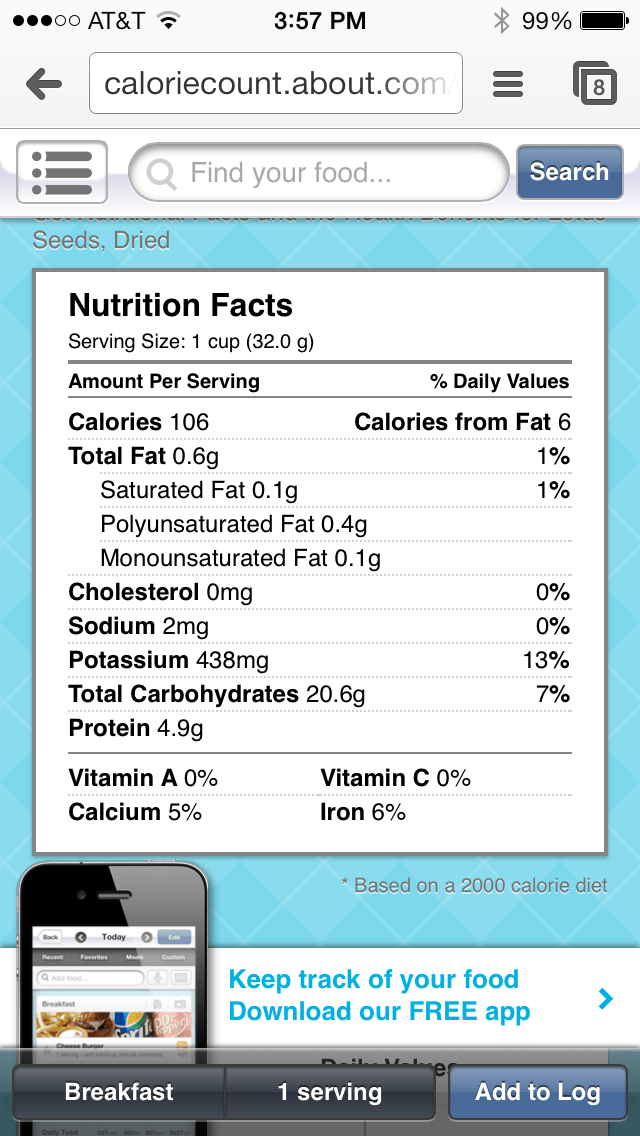
For those who are curious, here is the nutritional information for the dry puffed lotus seeds.
IMG_2804
Categories
Breakfast Fusion

Savory waffles.. traditional buttermilk waffles with an Indian twist

When I came to this country one of the many thing that I found interesting is the choices for breakfast. All the option available are on the sweet side. Pancakes, cereal, donut, pastry, oatmeal, cereal bars and the list goes on. When we started making healthier food choices, the goal was to incorporate whole grains and clean foods in the diet. One such ingredient is ‘Oats’, however all the options in the market are sweet in taste. So I decide to put an Indian twist to a traditional oats waffle recipe where oats are a main ingredient.

Savory Oats Waffles

IMG_2751

Ingredients

Dry ingredients
2.5 cups of rolled oats
1/2 cup whole wheat flour
1 tsp baking powder
1/2 tsp baking soda
salt to taste

Wet ingredients at room temp:
2 cups thick buttermilk
2 eggs
2 tbsp melted butter or oil

Adders
1/2 onion chopped
1/2 tsp chopped cilantro
1 green chili chopped
1/2 tsp cumin seeds crushed

1 tbsp grated coconut ( optional)
turmeric

IMG_2748

Procedure:
Dry roast the oats and grind them once cooled.

Mix the toasted oat flour, whole wheat flour, baking powder, salt, and baking soda in a medium bowl.

Whisk the eggs and melted butter together in another bowl, then add the buttermilk.

Add the wet ingredients to the dry and stir until combined.

Add all the adders like onion, chili etc. You can add any vegetable of your choice.

Rest the batter for 5 minutes, this is important so the buttermilk and baking powder can talk to each other.  

Pour the waffle batter into the hot iron. Close the iron top and cook until the waffle is golden on both sides.

IMG_2749

Note:

I mix the dry ingredients and keep them on hand, which makes it very easy to make it in the morning

I also have made a large batch and the waffles freeze very well.


Categories
Breakfast Fusion

Biryani Frittata

As a family we are trying to eat healthy. A big part of eating healthy depends on eating a good lunch and hence I have been working on some ideas for lunch. It has to be wholesome, easy to carry and pack , tasty and should taste good even when it gets cold. Yesterday I made a ‘frittata‘ for the lunch box. This dish is not an innovation but I really enjoyed  it due to the Indian twist. Kids loved it as well.

Biryani is a classic indian dish made with some kind of meat ( most commonly chicken or lamb) and seasoned flavorful rice. I love making chicken biryani and pack it for lunch many times. I did not have time to marinate and make chicken biryani for lunch so I decided to put a Biryani Twist on the frittata.

Biryani Frittata

IMG_3496

Ingredients

1 strip of bacon

1/2 chopped onion

1 chopped summer squash

1/2 chopped red bell pepper

1 cup chopped beet root leaves

1 tbsp chopped cilantro

5 eggs

2 tbsp  shaved parmesan cheese

1 cup cooked brown rice

2 tbsp oil

1/2 tsp smoked paprika

1/2 tsp turmeric

1 tbsp biryani masala

IMG_3488


Method

First cook bacon in a heavy skillet. Once cooked let it cool.

IMG_3486

Saute in oil  chopped onion, bell pepper, squash until nice and brown.

IMG_3489

While the vegetables are cooking, whisk together the eggs, biryani masala, salt and red chilli powder.

IMG_3491

Add cooked rice and saute well.

IMG_3492

Add chopped beet leaves.

IMG_3493

Now pour the egg mixture over the rice and vegetables. Sprinkle with cheese & chopped bacon.

Biryani Frittata

Cover and cook  until almost firm.

Set the over to broil. Broil it for 3-4 mins till the cheese crisps up.

IMG_3495

I packed it with a side of salad. Romaine lettuce with cilantro yogurt dressing.


Categories
General

मख्खन or Cultured Butter..it is all about the nostalgia!

Nostalgia is defined as  pleasure and sadness that is caused by remembering something from the past and wishing that you could experience it again. When I moved to the US I realized there are so many such things that make me nostalgic and funnily a lot of them were related to food. Food that was made for festivals, a dish mom prepared specially for my birthday, a visit to the farm and eating something farm fresh and the list goes on.  One such dish is the ‘White Butter’ or मख्खन as we call it in Hindi.  This is how butter was made in India before we started getting Amul which is an equivalent of the salted butter we get here in the US. It is one of those things that makes everything better in life. Serve it on a hot Jowar (Sorgum) bhakri, or eat it on a piece of toast, it just makes everything tastes better, and I think that is why it is the favorite of  Lord Krishna. He was fondly called a butter thief (मख्खन  चोर ). He would steal it and distribute it among the cowherds who would tend to the cows.

Fresh home made cultured butter

Since we do not get White butter here in the US, I decided to make it at home. I haven been making it for the last 2 years and loving it.

Ingredients:

1 quart Best quality heavy cream 3 tbsp yogurt with live bacteria

Method:

Heat the cream to 110 F. Let it cool down to 100F, do not let the temperature fall below that. Add the yogurt and mix well. Now you want to keep this mixture in a warm place so the bacteria get to work and the cream sets well. Once you have the set cream, it is time to churn till you get the butter. The butter will float on top and you would have buttermilk that is equally yummy. There are a couple of  tips I would like to share: 1. It helps adding a few ice cubes to help to butter to start forming a ball. 2. You can also strain the mixture to get all the buttermilk out of the butter. My mom also ‘washes’ the butter with cold water to remove any tart buttermilk from it. You want to wash it till you get pretty much clear water. white makkhan collage I love eating fresh butter with a whole grain unleavened bread, Bhakri.  Growing up Bhakri was the bread for dinner each night. Made from whole ground sorghum, it is my most favorite bread on this earth. I will write a post on it soon. Incidentally I came across an article in Food Wine on this very topic, here is the link to it.

Update:

I always make Makkhan the old fashioned way, culture the cream and then churn it with ‘mathani’. Since today I had to make it on a large scale I used Vitamix, and it was so easy. The jury is still out if the texture of the makkhan is the same but it sure took 1/10th of the time to make.

Makkhan in Vitamix

Categories
Recipes Soup

Wasabi Crusted Paneer steaks with a ginger broth!

Although I am a purist when it comes to making traditional recipes, I love to create new dishes using the same ingredients. So I was very happy when one of the facebook groups I follow had an interesting cook-off, ‘same but different’. One of the weeks the challenge was to create a recipe using the ingredients of the classic Indian dish ‘Matar-Paneer'( cottage cheese with peas). So I set of to create a dish with peas & cottage cheese.

The result of a few hours of thinking was the dish I am presenting today

Matar-paneer goes to Japan

Wasabi Crusted paneer in a spiced ginger broth

My family is crazy about wasabi flavor and I always have wasabi paste in my pantry. I also have roasted peas in my pantry but for this I decided to make my own wasabi peas, but you can use the readymade peas that you get in the market. I will post the recipe for my ‘wasabi peas’ soon.

Wasabi peas
Wasabi peas

Next came paneer. Although I used Panner for the cook-off as per the rule, I have made this with Extra Firm Tofu later on and turns out just as good .

I like to season at each step along the way. So the first seasoning for the paneer was some wasabi paste, sambal paste and some soy sauce.

Paneer Steaks

Ingredients

1 lb Paneer cut in thick pieces

1/2 tsp smoked paprika

1 tsp soy sauce

1/2 sambal paste

1/2 tsp wasabi paste

Marinated Paneer
Marinated Paneer

Let the paneer marinate for 30 mins. While the paneer is marinating, you can work on the broth. The broth I made is very gingery and I feel it goes well with the wasabi.

Broth:

Ingredients-

1 quart veg broth

1 inch ginger piece sliced thin

1/4 -1/3 cup rice vinegar

1/4 cup soy sauce

1/2 tsp sambal paste ( I add more since I like it very spicy)

1 pinch of sugar

1/2 tsp parika

1 handful of rice noodles

Method-

Combine all the ingredients for the broth and let it simmer for 15 mins. Add the rice noodles and continue cooking till the noodles are cooked.


While the broth is simmering you can now prepare the vegetables that go in the broth. Here keeping with the mustardy taste and flavor, I have used Chinese broccoli.

IMG_2647
Chinese Broccoli


Vegetables-

Ingredients-

2-3 cloves of garlic chopped

rough chopped Chinese Broccoli

Oil

Saute garlic in heated oil. Add the broccoli and saute for a couple of minutes. Do not let it cook completely. I feel that it should have a nice bite to it, which tastes great in the broth.

Now back to our paneer. Paneer will get pan fried.  Let us take the wasabi peas and crush them to a coarse powder. Now take the marinated paneer and dip it in the pea powder.

IMG_2641
Paneer with the crushed wasabi peas

Now in an omelette  pan shallow fry the paneer pieces till brown on either sides. You only want to turn these once so the coating stays on the paneer.

Pan frying paneer
Pan frying paneer

Now the fun part. We are ready to serve the dish.

Pour the aromatic, spicy  hot broth in a bowl. Add the sauted vegetables and top it with the paneer pieces.

Wasabi crusted paneer steaks


Note:

You can easily substitute extra firm tofu for paneer in this dish and make a completely vegan dish

The broth is similar to what Tayler Florence had shared in one of this programs

← Back

Thank you for your response. ✨

Categories
Vegetable curries/daal

Sprouted fenugreek seeds curry

When you think of Fenugreek seeds, you think of its bitter taste. It is amazing how different the same seeds taste once sprouted. I have another post on Methi Sprouts. Today we will be making a curry with these sprouts. My recipe is based on an old cook book.

Sprouted Methi Usal

Sprouted Methi Usal

Ingredients:

2 cups sprouted Methi seeds

1 onion chopped

2 tomatoes finely chopped

1/2 cup fresh coconut

2-3 tbsp of roasted peanut powder

1/2 tbsp jaggery

1/2 tsp goda masala( or any other subji masala)

1/2 tsp red chili powder

oil for tempering

1/2 tsp mustard seeds

1/2 tsp cumin seeds

1/2 tsp turmeric

pinch of asafoetida

salt to taste

chopped cilantro

Ingredients for Sprouted Methi Usal


Method:

Heat oil in the pan. When the oil is hot add mustard seeds, cumin seeds and turmeric. Once the mustard seeds pop, add asafoetida. Add chopped onions and saute until brown. Add tomatoes and cook a little more. Now add the masala and red chili powder. Add the sprouts and 1/2 cup warm water. Cover and cook till the sprouts are done. It takes about 5-7 minutes. Now add jaggery, coconut, peanut powder and cook a little longer. Add salt to taste. Add cilantro and serve.

Method IMG_3375


It is ready to be served with fresh roti or rice.

Note: The sprouts do have a bit bitter taste which gets less intense if you let the sprouts grow  for a little longer time.


Categories
Healthy foods Sprouts

Fenugreek (Methi) Sprouts

In the recent years fenugreek has been getting popular in the western world. I have seen GNC selling Fenugreek tablets. According to the ancient Indian tradition, fenugreek is given to postpartum women as it is known to have a positive effect on the milk production. It is also known to help those who are diabetic and with high cholesterol problem.

Indian cuisine offers many ways to cook Methi ( Fenugreek). We saute the leaves, cook it with lentils and many more. What I am sharing here today is a not a very commonly known way of eating Fenugreek.

Sprouted Fenugreek Seeds

IMG_3369

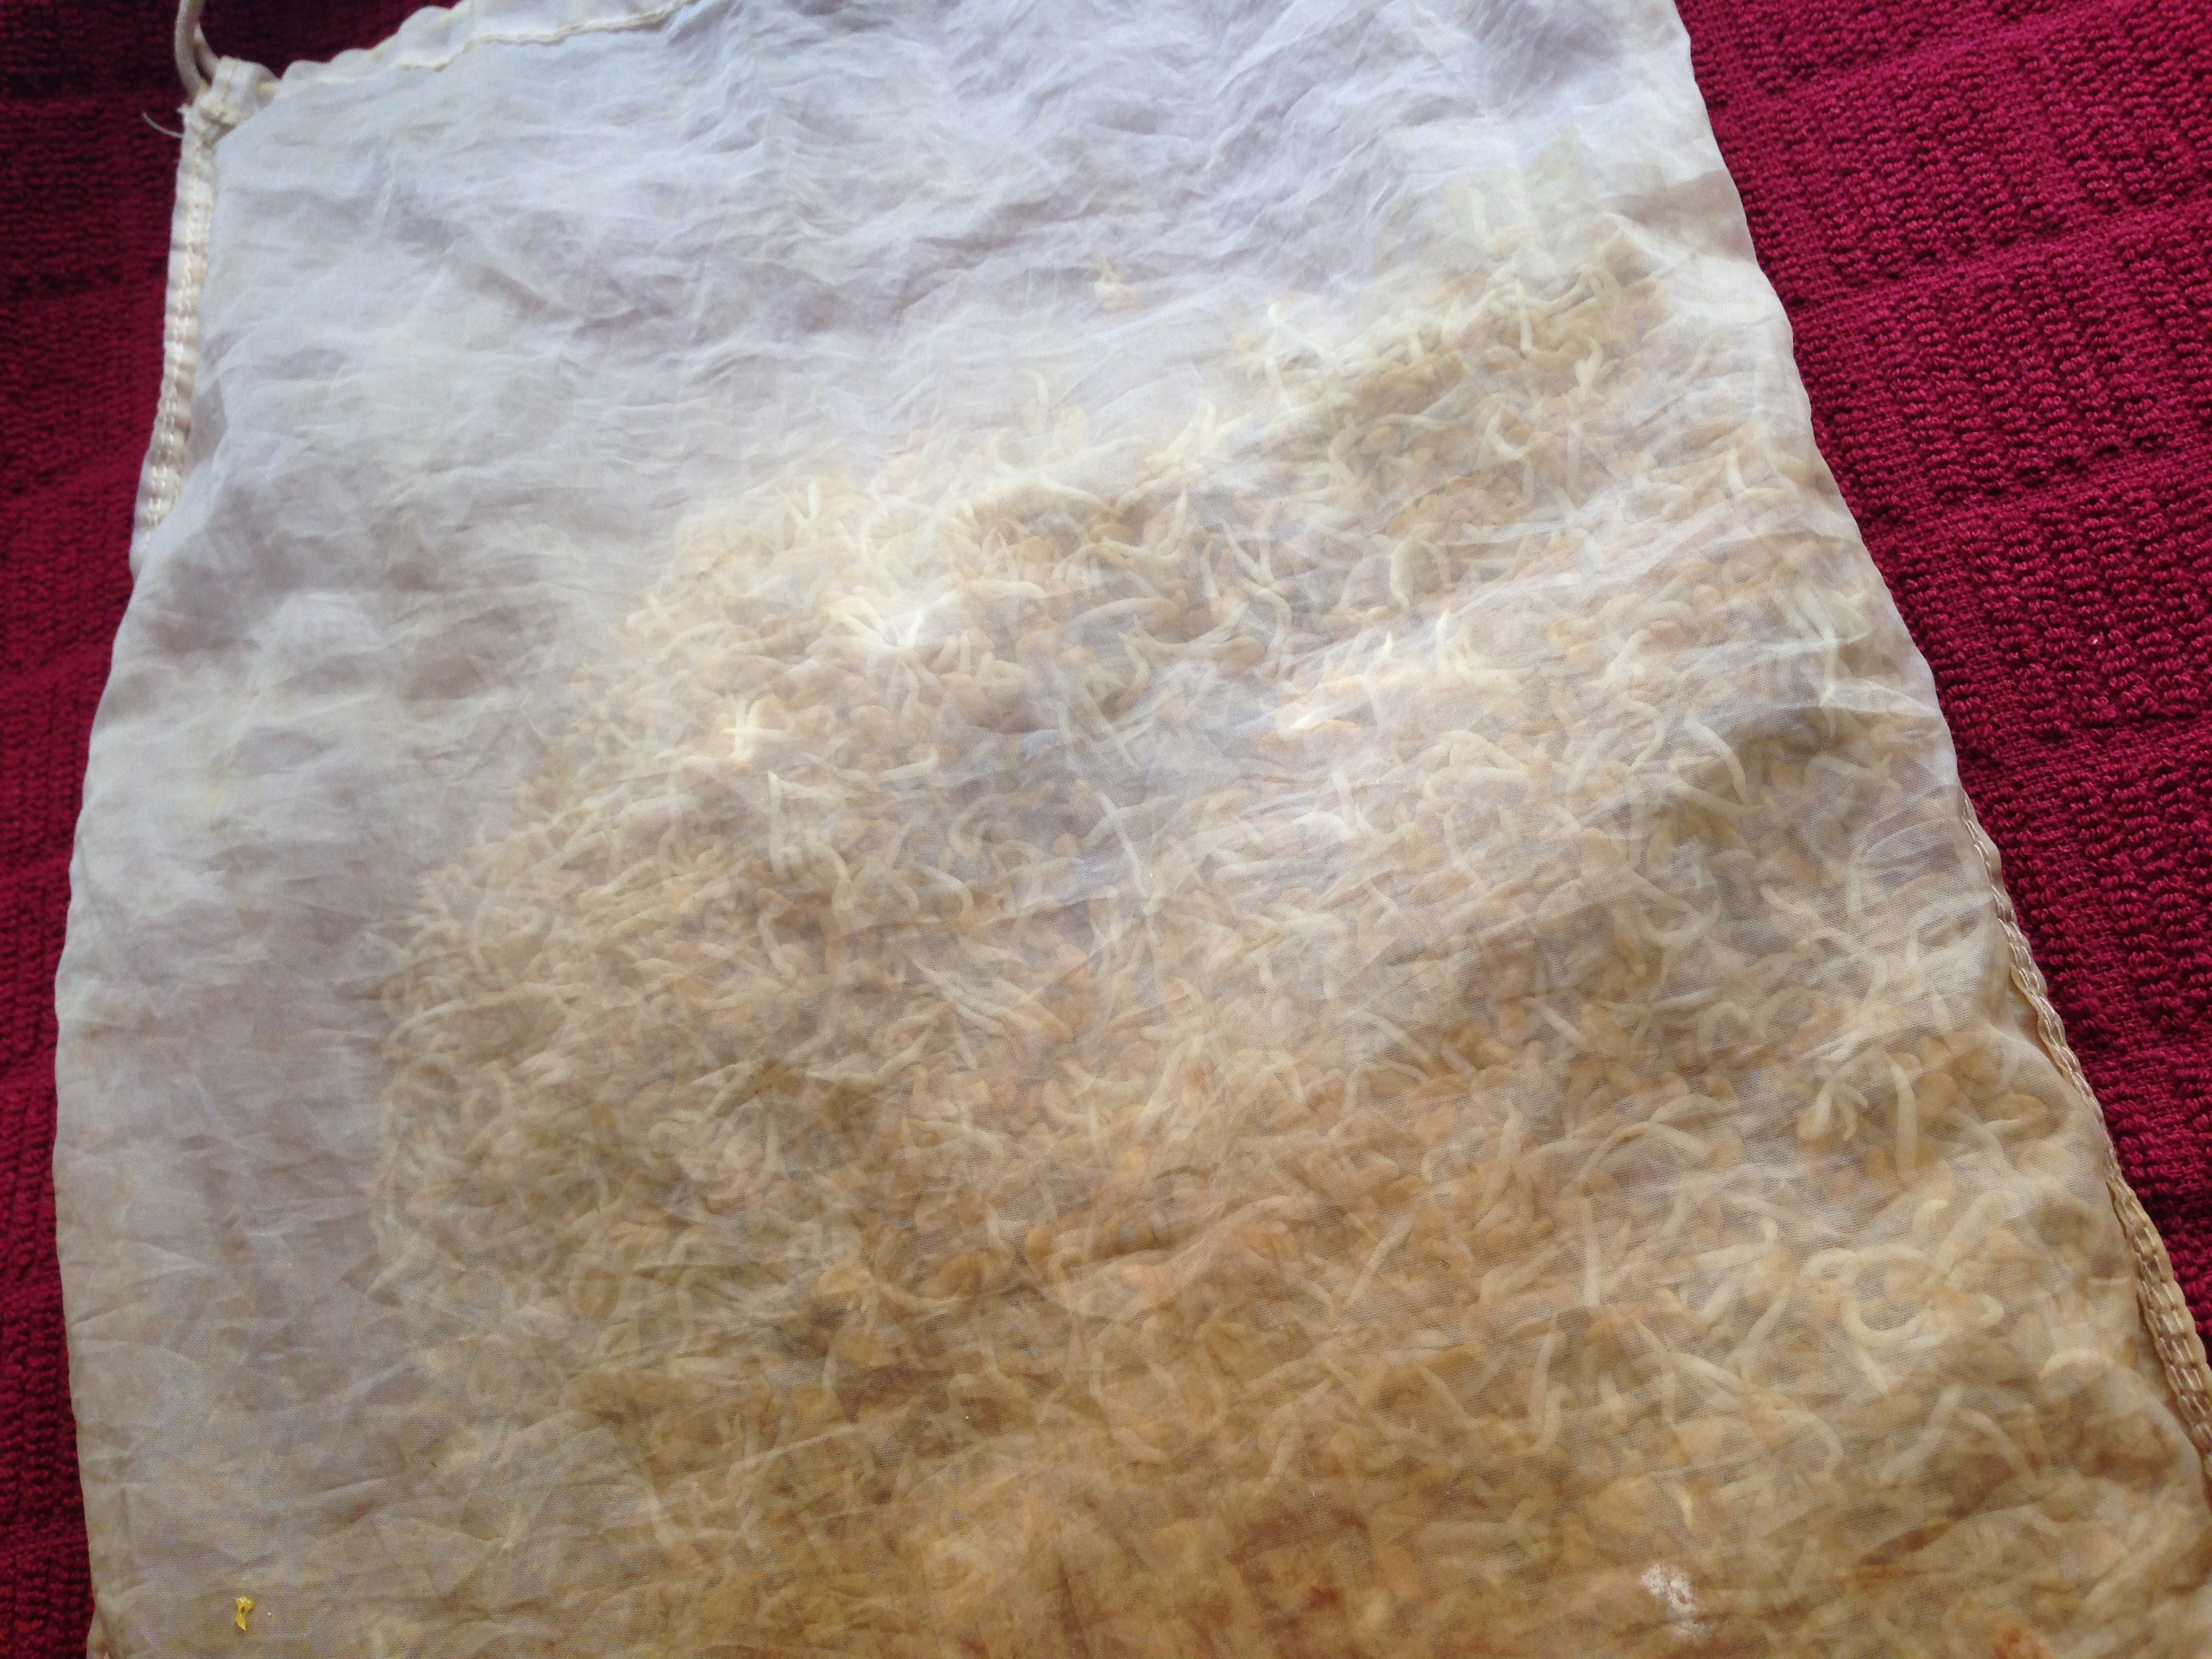
Soak the fenugreek seeds in water for at least overnight.  Drain it in the morning and tie it up in a thin cloth and keep it until these are sprouted.

Methi seeds in a bag

You can see that they more than double in the size. You can keep them in the cloth a little longer and you can start seeing small leaves.

Methi seeds raw and sprouted

Now the sprouts are ready to be used. Today I am making a traditional Maharashtrain curry with these sprouts.

Methya chi usal ( Fenugreek sprout curry)


en_USEnglish