Categories
BBQ Healthy foods

Veggies on the barbecue

Veggies ready for the grill

Stuffed peppers

I love making this pepper, they are so colorful and appetizing. They are almost sweet in taste and pair well with spicy fillings. They are perfect bite size, you can just pick it up with the stem and pop it in your mouth. I try to make a couple of varieties, one with the vegetarian filling and the other with some meat.

Take 1: Vegetarian

Ingredients


2 potatoes boiled and mashed

1/4 red onion finely chopped

1/2 tbsp chopped mint

1 tbsp chopped cilantro

1 serrano pepper finely chopped

1/2 tsp Saunf, roasted

1/2 tsp Cumin seeds

1/4 tsp Coriander seeds

1/2 tsp Black salt

1/2 cup grated paneer

1 pinch of Kasoori Methi

Method

Take all the dry spices, roast lightly & pound it in a mortar & pestle. I feel grinding fresh spices make a huge difference in the taste of the dish.

Mix everything together.

Make slits in the pepper and fill it with the stuffing.

You can pan fry them but I think I like them the most when they are grilled. I have this pan that you can use on the grill, I love it. You get the flavors of the charcoal grill and can easily cook the peppers & flip them easily. I also use it to grill the fish, make Paneer Tikka.

http://www.worldmarket.com/product/nonstick+metal+grill+grid.do?&from=fn

Brush the peppers with some oil, and cook till you see some nice black spots.


Spiced Cauliflower

tri color cauliflower

I am one of those people who love, love cauliflower. I make Cauliflower soup which is a perfect beginning for a winter meal. I can eat a whole head of cauliflower for a snack, roasted, steamed all of it. So I decided to try the cauliflower on the grill..my favorite way of cooking.

This is so simple to make but turned out really great.

Ingredients


1 head of Cauliflower broken into bite size pieces

Oil to cover all the pieces

1 tsp salt

1/2 tsp turmeric

1 tsp Chili powder

1/2 tsp dry ginger powder

salt to taste

2 tbsp Chickpea flour ( Besan)

Method

Make sure all the pieces are of similar size, that way when you cook them, they will get cooked at the same time.

Mix the cauliflower pieces with oil, and toss it very well. You dont want to be stingy when it comes to oil, it is needed to make these pieces crispy. And most of it will burn off on the grill.

Mix in all the dry spices including salt.

Now add besan and mix well.

Cook it in a basket. I love this idea since it is easy to keep tossing as it is cooking.


Cook until crispy. Make sure you keep the heat medium, if it is too hot, the pieces will be burnt but not cooked through.

Marinated Vegetables

BBQ Basket

You can not go wrong with this recipe. The vegetables are so flavorful and the grill adds an additional layer of flavor. I use whatever I have on hand, though it always has some sort of peppers and mushroom. This time I used, red bell pepper and shishito peppers and some zucchini. I love adding large pieces of onions, they taste amazing when they are nicely caramelized on the grill.

Basically you make a vinaigrette  and toss whatever you have on hand in it.

Ingredients

6 cups Mushrooms whole

2 cups Shishito peppers

1 red onion quartered and then separated into single layers

1 zucchini cut into bite size pieces

1 red bell pepper cut into large square

2 cloves of garlic crushed

1/3 cup olive oil

2-3 tbsp  Balsamic Vinegar

Fresh crushed black pepper

salt

4 tbsp chopped fresh herbs like Parsley, mint, basil

Method

Mix all the ingredients except the vegetables in a large bowl, whisk it well. Toss in all the vegetables and keep aside for at least 2 hour.

Grill it in the basket, tossing to make sure it is grilled from all the side.


Grilled cherries

When I first read about it, I thought it was completely crazy but decided to give it a try. It is a painful process to pit the cherries but I think this recipe makes it worth it.

Ingredients

4 cups of pitted Cherries

1 tbsp Agave nectar

2 tbsp Balsamic Vinegar

1 tbsp butter

Method

Layer the cherries on an aluminum foil on the grill tray on the grill. This will ensure that all the juices stay inside. Cook for 7-8 mins. While it is cooking mix the rest of ingredients.Pour over the cherries and cover the cherries to make a packet.

Cook for another 10-12 mins. Take the whole packet on a plate, open carefully. What you will see inside is a ooey gooey yummy fruity topping. 🙂

You can serve with vanilla ice cream..but I think it tastes the yummiest with ‘sweetened ricotta cheese’.


Categories
Fish Healthy foods Main Dish Not sure

Grilled trout with herbs

I love summers especially since we can enjoy barbeque outside. There is something special about this time of the year when you get abundant  vegetables and fresh herbs in the farmers market, all the produce is at its peak and taste great.

trout5

I love summers also because we can grill out side. You can just have meats and veggies ready and when everyone gathers, just throw them on the grill and you got yourself a meal. There are two camps when it comes to grill, the coal one and the non-coal one, we for sure belong to the first one. In my opinion nothing beats the taste of fresh corn on the cob just grilled to perfection on the coals. The chicken tikka with the smoky flavor of the coal tastes amazing. So as you can see we love grilling with coals.

So today we had a few friends over for BBQ. I had marinated a lot of veggies, made some stuffed pepper , there was fresh corn on the cob, some couscous, masala chicken and my son decided to make some fish.

Veggies ready for the grill

When it comes to fish I am very picky, not because I want to be  but because of the fact that I can only eat fresh water fish. I am ok with catfish, bass etc but can not eat salmon.

So when my son decided to make trout and that too whole fish, I was a little skeptical but decided to go along. He went and bought the trout from Whole Foods, and made it with very simple ingredients..but man it tasted so yummy. It was delicate yet flavorful.

Ingredients

4 whole fresh water trouts

few sprigs of dill

few leaves of sage

few sprigs of parsley

few taregon leaves

2 lemons sliced

salt & pepper

Olive oil

Trout 7

Method

With a sharp boning knife slice the fish horizontally.

Apply some olive oil both inside & outside.

Sprinkle with salt & pepper.

Layer the inside with some herbs and lemon slices.

Trout 2

Let it sit for 10-15 mins covered.

Trout 1

Brush the grill with olive oil. And place the fish gently on the grill.Cook for 3-4 mins on the first side and then a couple of minutes on the other side.

To serve

Take the main bone out, take the fins, head and tail off. Make into fillet and serve. My son did an amazing job of taking the main bone out and filleting the cooked fish.


Categories
Chicken Thai

Thai basil chicken

If I had to pick my favorite food it is obviously Indian, I grew up in India and that was the only cuisine I ate until I came to the USA. When I came to the United States is when I tasted Mexican and Thai cuisines. And now these two cuisines are my favorites. I love the use of fresh herbs in thai cuisine. Galangal, lemon grass, kaffir lime leaves and of course Thai basil. These aromatic herbs add a lot of flavor without any fat and most of these also have medicinal properties. In spring you get many kinds of basils in the farmers market and one of these basils is ‘Lemon Basil’- it has a unique flavor which is a combination of lemongrass and basil. I love it. Today’s recipe is super simple and can be made in 15 mins if you have all the ingredients ready.

Thai Basil Chicken

Ingredients

2 chicken breasts, chopped in small pieces 4 cloves of garlic 4 thai chilies ( adjust as per your spice level preference) 1/2 tsp oyster sauce 1/2 tsp sweet soy sauce 1/2 tsp dark soy sauce 1/2 tsp sugar A handful of basil leaves

Method

Make a coarse paste with the chilies and garlic. Don’t make it extra fine. I feel like the ingredients are simple and so is the technique. I prefer using mortar pestle for making the chili garlic paste.   Heat oil in the pan. The pan should be super hot. Make sure you are ready with all the ingredients, you don’t want to eat burnt garlic. Sauté the garlic paste for a few seconds making sure it does not burn. Add chicken pieces and sauté for another 30 seconds. Add the liquid mixture of soy sauces, oyster sauce and sugar. If the chicken is cooked, add the basil leaves and turn the heat off.   Cover and let the basil flavor infuse in the meat.      Serve with brown or white rice. Vegetarian option It is made exactly the same way as the chicken. I like to use vegetables like mushrooms, snow peas, broccoli, bell peppers and onions. Make sure you cook the vegetables on high heat so that they don’t give out water and become soggy. Once ready you can also mix these vegetables into your chicken to combine to make a wholesome dish. I always  include vegetables in our meals and also if you have any vegetarian friends they can also enjoy the lovely flavor of the lemon basil if you make this variation.

Categories
Appetizer Chicken Healthy foods Kids favorite Not sure

Chicken porcupine  kabob

  You hear all the time that kids are fussy eaters and you got to try all kinds of tricks to get them to eat good stuff. I must say I got lucky, both my kids never troubled me with eating, they eat anything & everything I make for them( may be barring ‘indian bitter melon). 

I also see and hear that the kids want to eat junk and throw tantrums if they don’t get any. I have seen kids eat chicken nuggets everyday. Again, I can not complain here, my kids don’t eat junk at all, in fact if you open my pantry, you will not find any chips, cookies with vegetable shortening. Instead of eating something that is processed and full of preservative, excess salt and sugar, my family eats dry fruits, dehydrated fruits & veggies, nuts…I am very thankful for that. 


As you can see, my pantry is loaded with nuts, dry fruits, healthy indian style popped lotus seeds etc. I have a designated place for everything so they find it easily. Most of  my containers are clear and labeled.   


So back to the making food for kids. I feel that if you make it fun, the kids enjoy and might try different things. 

Today’s recipe is one such fun recipe. It is tasty, healthy and easy to make. 

Chicken porcupine kabob 


It is a very simple recipe and if you have all the ingredients, you can make it in under 30 mins. 

Ingredients

3/4 lb ground chicken ( I use a combination of breast & thighs)

1/2 onion chopped really fine

1-2 cloves of garlic crushed

1/2 inch Ginger, chopped or grated

1 green chill finely chopped 

1/2 tsp garam masala

1/2 tsp cumin powder

3/4 tsp coriander powder

1 tbsp chopped cilantro

1 tbsp chopped mint

1 tsp chaat masala

Others

1/2 cup  basmati rice plus 1tsp salt, soaked for 1 hour

1 tbsp oil

Method

Drain the soaked rice. Take it on a plate. 

Start boiling the water to steam out Kabob. 

Mix all the ingredient for kabob very well. 

Take the oil in a bowl. 

Make small balls from the chicken mixture. Dip it briefly in the oil, and roll in the rice grains. 

Arrange them on the steamer dish. 


Steam for 5-7 mins depending on the size of the chicken ball. 

Take out one and check if the chicken is cooked through. 

 Edit   

As  you can see the rice is steamed and pluffs up nicely. 

You can serve these with spicy mint chutney or a sweet and sour tamarind chutney or tomato ketch up.  

Edit   

Categories
Breakfast

Swiss Muesli- easy and healthy breakfast

Simple, healthy, easy to make, tastes yummy and you can make so many variations, how many times can you say that about a recipe? This recipe definitely one such recipe.

When we say Muesli, I used to think of the boxed cereal you get in the supermarket. When I went to London for work I stayed at a hotel where there was a tiny spread of food for breakfast, and in that tiny spread there was a large white bowl filled with  what seems like a tasteless gooey pudding. It did not look appetizing at all. My motto is  try different foods, if you dont like it don’t eat it again, so I decided to try this pudding as well.

I must tell you that I have not been fooled by the looks of a dish ever as I did that day. I fell in love with this dish. It was fresh, healthy and so tasty.

I started reading about it and found out that this is also a type of Muesli, called ‘Bircher/Scandinavian/Swiss Muesli. Unlike its american cousin which is eaten out of the box with milk, this European baby is made with fresh fruit and yogurt.

I love the fact that it can be made ahead, in fact it tastes better when left overnight, which means you have a yummy breakfast that can be made the night before. Can you imagine not having to worry about breakfast as you are rushing to get out the door in the morning?

I also like that it is made with very healthy ingredients like oats, fresh fruits, nuts, milk & yogurt, it is a perfect combination of Carbs with a lot of fibre, protein from the dairy, vitamins from the fruit & healthy fats from the nuts.

It is amazing how many combinations you can make, which also allows me to incorporate all the seasonal, local produce.

2015/02/img_2225.jpg

Ingredients

 1 1/2 cup rolled oats 

 1 cup low-fat Yogurt

1 cup milk ( take any kind you like) 

 2 apples grated 

 1/4 cup sliced almonds 

1/4 cup golden resins

 1/4 cup dried cranberries

 1/2 cup orange juice

 1/4 cup sliced almonds


Method:

Combine all the ingredients in a large glass or plastic container

Mix well. 

Serve ideally the next morning, I feel that the flavors blend really well. 

If it is too thick, add milk to get the desired consistency. 

Categories
Appetizer Fish Mexican

Ceviche – a healthy, flavorful way to eat fish

2015/02/img_2188.jpg
Tilapia Ceviche


Tilapia Ceviche

The weather is warmer and the family wants to eat fresh fruits, lighter meals. It is not easy to cook something which is fresh, healthy and tasty. And of course it has to be easy to make.
One such dish is Ceviche.

The first time I ate Ceviche in Cabo San Lucas. We were on our annual vacation. All of us are big foodies so invariably the first thing we do when we go to a new place is to find out good food joints. When we asked the person who cleaned our room what her favorite place to eat was, she told us about this small place near the beach. We got out of the resort, took a local bus and reached this small village. There was this cobble stone street that went all the way to the beach. The village center was a church and around that there were many vendors selling various things. We also had the best fish tacos there.
We found the small shop that lady had recommended, that is where I are Ceviche the first time.
Let me tell you, I am not a fish lover rather I eat only select kind of fish. So for someone like me the idea of eating raw( it does get cooked in the acid) was pretty tough to try. But am I glad I did. That fish was perfectly cooked and marinated in the lime juice and paired very beautifully with crunchy cucumbers, onion, creamy avocado and with a kick from Serrano pepper.
It was a perfect warm weather snack.

So here is my take on Ceviche.

Ingredients:

2 tilapia fillet, chopped in small pieces
1 cup lime juice

2015/03/img_2174.jpg

2015/03/img_2175.jpg

1/4 onion finely chopped 2 Persian cucumbers chopped fine(you can also use equivalent English cucumber)
1 Serrano pepper chopped fine
1/2 cup chopped cilantro
1 tomato chopped ( don’t take the seeds)
Salt to taste         2015/03/img_2186.jpg    

It is important to chop the vegetables in a uniform fashion, it looks pretty and you get a sample of all in one bite. 

Method:

Mix the lime juice and tilapia pieces. Make sure you use a shallow container so that all pieces are covered in the lime juice. Sometimes I like to use orange juice in addition to the limes you use. Here I have used a blood orange that has given nice pink hue to the fish.
Let it sit for at least 45 minutes in the fridge. Then you take it out, the fish would look white, very opaque. This is the sign that the fish is cooked in the acid.

2015/03/img_2177.jpg

Drain the fish in the colander.

While the fish is in the fridge, chop all the vegetables and mix them in a bowl together. Add salt to taste.
Add the drained fish to the vegetable mixture and mix everything well but with the light hand. You don’t want the fish or the avocado to break and become mushy.

It has a very fresh crisp taste and goes really well with crostinis, pita chips, tortilla chips or even in lettuce cups. I serve it in empty avocado shells, it makes for a great presentation.


Categories
Condiments Indian Kashmiri Pickles & Chutneys

Smoked Walnut chutney- a treat from Kashmir

Indian food for non-Indians is naan, butter chicken, chole, saag, as that is the only food they have been exposed to in the restaurants. You would think Indians would know everything about different types of indian foods but Indian food is so diverse and regional that many a times you only know about the food from yours and may be neighbouring region. So even though I grew up in India, there are many indian delicacies that I had not even tasted. For example, Assamese food, Bengali Food or Kashmiri Food.

So when I came to think country, I not only learnt about different cuisines of the world but also different regional cuisines of India as well. The Indian grocery stores here carry things that are used in Kerala, Maharashtra, Punjab and many other Indian cuisines. One such item was ‘Lotus Stems’, growing up I had never eaten a lotus stem. It is very commonly used in Punjabi & Kashmiri cuisine. In Kashmir they call it ‘Nadru’. So when I started reading about how to cook Nadru, I came across many Kashmiri delicacies. I make many kashmiri dishes now, and I will be sharing a few here.

Today’s recipe however is from a facebook food group. When I saw this post, I knew I had to make it.

I love anything smoked, I love onion, green chili and I love walnuts…so this recipe was just too good to ignore.

Smoked Walnut Chutney

IMG_1659

It is so simple to make yet fantastic flavors

Ingredients

IMG_1653

1/2 cup walnuts

1/3 cup onion chopped

2 green chilies

1/2 tsp crushed red chilies

1 tsp jeera

1/2 cup or more chopped cilantro

salt to taste

For smoking:

1 piece of coal

Few drops of mustard oil


Method:

Dry roast the walnut and jeera slightly.

Add all the ingredients to a mortar and pestle. On a related note, I am obsessed with the mortar & pestles, I have many in my collection 🙂

IMG_1655

Pound all the ingredients till you get a coarse paste. I feel that the coarse texture add to the taste of this dish.

IMG_1656

Now take out the chutney in a bowl.

IMG_1657

Cover the bowl with a leaf. If you don’t have a leaf, you can use a aluminium foil and poke a few holes in it.

IMG_1661

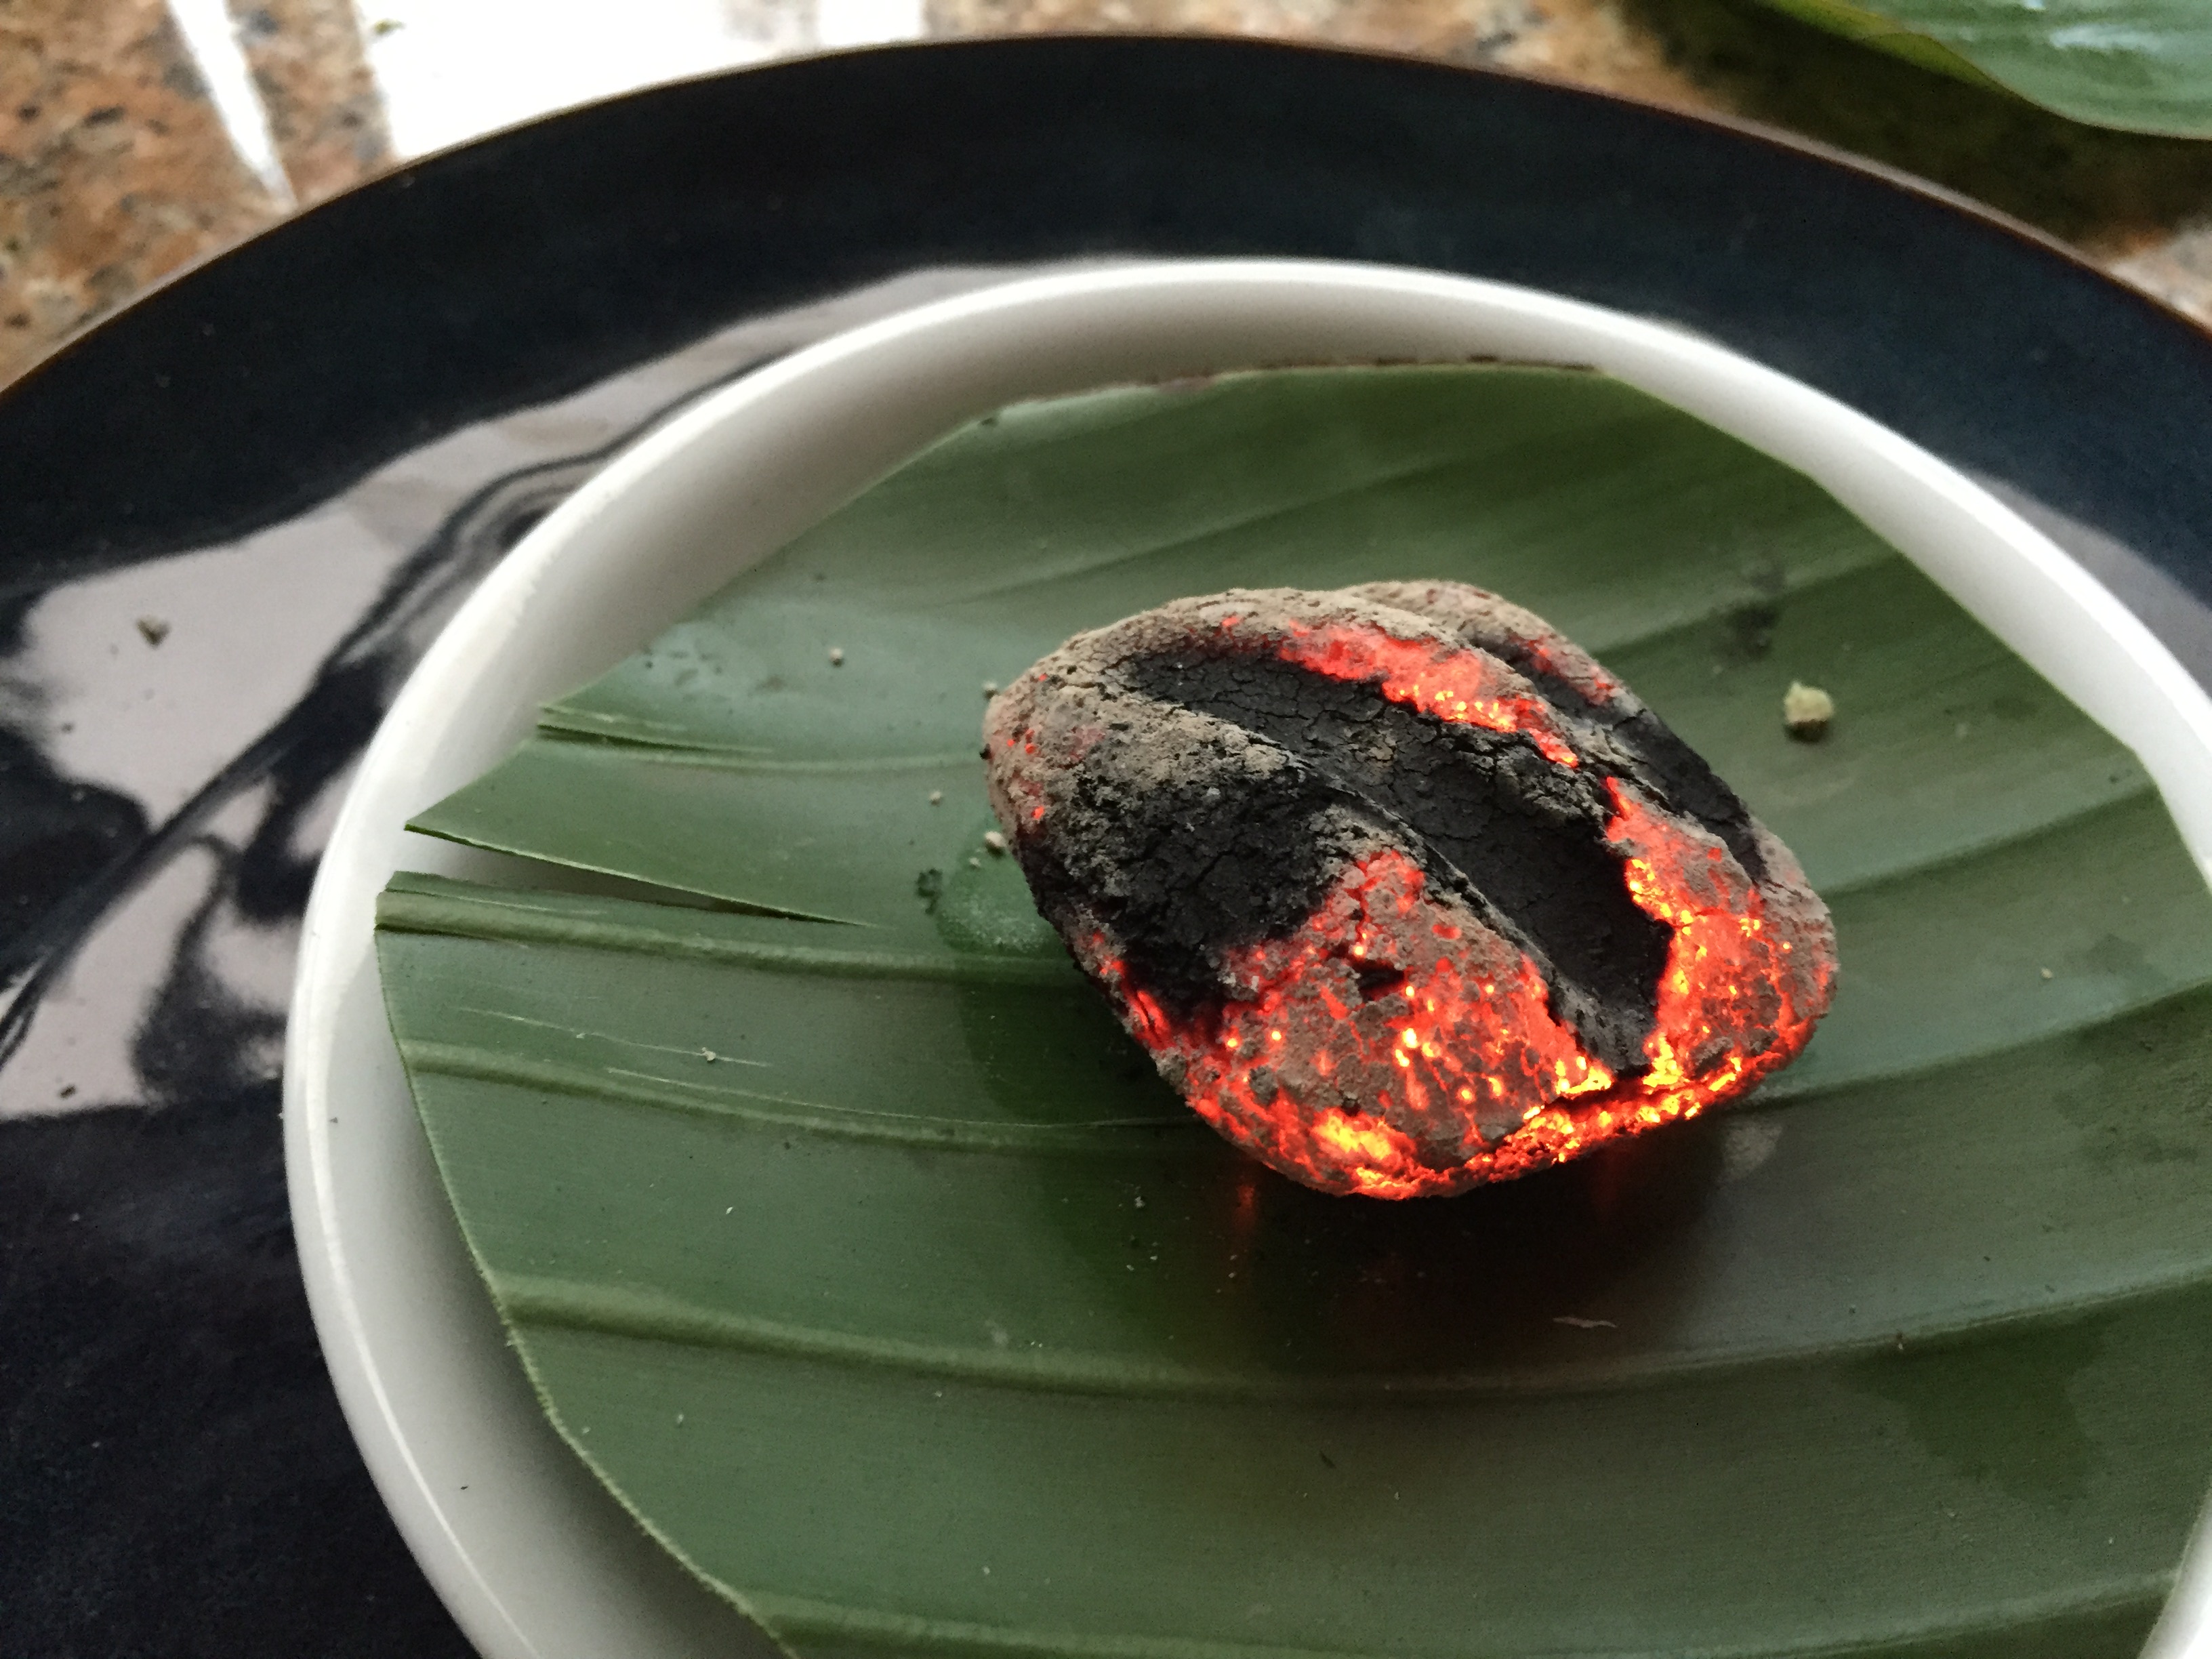
Now take a piece of coal and burn it on the gas flame till it is bright red.

IMG_1662

Now place the coal on top of the leaf.

IMG_1663

Pour a couple of drops of mustard oil and cover immediately with a bigger bowl.

IMG_1664

You will see that it smokes up quickly.


IMG_1665

After a few minutes when the smoke has died down, open carefully and enjoy. The recipe looks very easy, but I was amazed how delicious it tastes. Give it a try.

You can even serve it with pita chips as a dip.


Categories
Curry Indian Vegetable curries/daal

Lauki majedar

I try to eat and cook only what is in season, so I only shop at the farmers market for my fruits and vegetables. You will always find some kind of squash in season. Most of the summer and almost through the fall season, you will get opo squash in the market. It is  easy to clean and very nutritious, so I try to include that in our diet as  I can, be it in the form of a salad, curry, Soup, Parantha( Indian flat bread) or even dessert. Although it is very good for you, it can be very bland testing and needs some dressing up.

Typically you will find Lauki made with some sort of lentil, or in a form of a kofta. This recipe is none of that, it is very simple and easy to make.  I also like the fact that it does not have onion or garlic and hence can be a nice addition to a dinner plate with  other curries with onion, garlic.

For last night’s dinner I made egg curry which had onion and garlic, so I made the lauki majedar to compliment it.

IMG_1556


Ingredients

1 lauki ( squash)

1 tbsp Panch Phoran

1/2 tsp turmeric

1/2 inch ginger

1 green chili

1 roma tomato

Cilantro for garnish

Oil

1/2 tsp ghee ( optional)


Method

Peel and chop the squash in fine dice. Chop tomatoes in small pieces. Chop ginger in fine pieces. Chop green chilies in fine pieces as well.

Heat oil. Add panch phoran, turmeric saute for 10 secs. Make sure that the panch phoran does not burn otherwise the methi might start tasting bitter.

Add ginger and green chilies, saute for 10 secs.

Add the chopped tomatoes and saute for 20 secs.

Add chopped squash and mix well. Add salt to taste and cover. Cook on low flame until cooked.

Add the ghee if using.

Garnish with chopped cilantro.

Categories
Breakfast Fusion Healthy foods

Breakfast( or Lunch) muffins with Quinoa

It has been crazy last few days, have not had a chance to write a post. This one is from the archives.

It is always challenging to pack something for the kids lunch that is healthy, quick to make, should taste good at room temperature and last but not the least, the kids should like it. This recipe fits the bill in my household. I like it since it is nutritious and quick to make.

So I will be honest that I don’t love quinoa. I know there are many good proteins in quinoa but I can not bring myself to use it as a substitute for rice in any traditional Indian recipes.
I also think that there are many people in the world who don’t have quinoa in their diet and still they have managed to stay healthy.

Having said that I do try to incorporate as many wholesome ingredients in our diet as I can, so this recipe is an effort along those lines.

Healthy eating series- Breakfast muffins with Quinoa

10147702_10203552114712932_122240941_o
So I will be honest that I don’t love quinoa. I know there are many good proteins in quinoa but I can not bring myself to use it as a substitute for rice in any traditional Indian recipes.
I also think that there are many people in the world who don’t have quinoa in their diet and still they have managed to stay healthy.

Having said that I do try to incorporate as many wholesome ingredients in our diet as I can, so this recipe is an effort along those lines.

Quinoa Muffins-
4 eggs
1/2 tsp paprika
1/2 tsp pav bhaji masala
3/4 cup cooked quinoa
1/4 cup chopped red bell peppers
1/4 cup chopped zucchini
1/4 cup onions caramelized ( I usually make a big batch and keep it in the fridge)
1 tsp chopped cilantro
1/4 cup chopped ham( optional)
1/3 cup shredded cheese

Prepare oven to 350 F. Line a muffin pan with cupcake liners
Spray with oil spray.

Beat eggs well with dry spices & salt. Mix rest of the ingredients.
Pour in the cupcake liners and bake for about 25-30 mins.

I pack this with a garden salad for my kids lunch box.

This recipe makes about 6 muffins.

Note:


I had made similar recipe with lemon rice quinoa with lots of green chillies and peanuts. That tastes good as well.


I did not get a chance to take step by step pictures this time, will update the post when I do next time.

Categories
bread Indian

Jowar Bhakri- Sorghum flat bread

Jowar Bhakri (ज्वारीची भाकरी)

IMG_2251 1

Whenever I talk to any non-indians about Indian breads, most of them only know naan. Although I like Naan, there are so many different breads that are part of the Indian cuisine  that the rest of the world  is unaware of. I hope to do a series of posts on various Indian Breads.

My most favorite Indian bread is actually a flat bread.

What is Jowar(Sorghum)?

Jowar is a grain cultivated through out India. It is considered a cheap alternative to wheat. It is a very healthy grain with a lot of fibre and rich nutrients that are supposedly beneficial to fight against diseases like cancer, diabetes. The list of health benefits is pretty long.


IMG_1988
Jowar fields

Jowar bhakri is very common in many parts of Maharashtra and Karnataka, especially  it is an integral part of the Farmers’ diet.In the villages Bhakri is made typically on a wooden stove. The smoky flavor you get with that is unmatchable.

IMG_3859

I love to eat bhakri right off the stove, with a pinch of salt, onion and green chili, I feel that it is the best food on the planet. In fact, if I am asked on my death bed what I would like to eat, it would be bhakri.

I typically make Bhakri with spicy chicken and some greens.

Today’s post is dedicated to ‘Jowar Bhakri’

Ingredients are very simple, Jowar flour & water. How much simpler can it get. The trick is in making these beauties.  Although I did not cook at all before I got married, this is one thing I made sure I learnt how to make.  I thought it will be easier to explain it through videos rather than just the pictures or words.

So here is my attempt to capture Jowar Bhakri Recipe.


Ingredients

2 cups of Jowar flour

about 1 cup of water

Method:

Step 2:

Make a dough with the flour. Make sure you knead it a bit to ensure that it is smooth. It will be almost the consistency of mashed potatoes.

Step 3:

Make a flat bread patting with you hands. Use flour to ensure that the bread does not stick to the board or your hands

Step 4:

Heat the pan on med-high heat and ensure it is hot before you start to roast the bread on it.

Step 5:

Put the flattened bread on the pan. Make sure you put the flour side up. Spread some water on it. This helps remove the excess flour.

Step 6:

As soon as the water sort of dries up and the first side sort of turns opaque, flip over to roast the second side.

Step 7:

Roast the second side till you see nice brown spots on it.

Step Final:

Once the second side is roasted well, take the pan of the stove and roast the first side directly on the flame.

Step 8:

Enjoy with your favorite curry ‘Chicken Savji’. I made this typical Maharashtrian dinner tonight.

IMG_2251 1


en_USEnglish